Guy's Blog

Guy frequently keeps this blog updated with thoughts, challenges, interviews and more!

Tag: capoferro

This post is intended to be useful to the attendees at the recent seminar I taught with Chris Vanslambrouck in Madison, Wisconsin. It may also be of interest to folk who couldn't make it.

First up, huge thanks to Heidi Zimmerman who organised the seminar. It literally couldn’t have happened without her. And thanks also to Chris Vanslambrouck, who co-taught the seminar, with related plays from Meyer. Given that there was also a lot of Meyer technique being taught that weekend, it’s a miracle we covered so much ground, so hats off to the students. I’ve assembled a list of the material we covered, some planned, some answers to questions posed by the students.

Saturday: Fiore Longsword

We started with the most  basic blows, and saw how they created the guards.

The blows were:

  • Mandritto fendente
  • Roverso fendente
  • Mandritto sottano
  • Roverso sottano
  • Thrust

You can find a more complete version of the drill we used here:

And the guards they created were:

  • Posta di donna destra,
  • Posta di donna lasinestra,
  • Posta longa,
  • Tutta porta di ferro,
  • Dente di zenghiaro, coda longa

You can find all the guards here: https://swordschool.com/wiki/index.php/The_12_guards

We then did a parry and strike from donna, against the mandritto fendente, and a parry and strike from dente di zenghiaro, against the same blow. The latter is the beginning of our Second Drill:


This lead us to the universal counter-remedy: the pommel strike (as shown in the 8th play of the master of coda longa on horseback).

We then defended against thrusts with the Exchange of thrusts:

Then Breaking the thrust:

In the afternoon session we covered the rear-weighted guards (donna and fenestra), and briefly went over the 3 turns (volta stabile, meza volta, tutta volta), and the four steps (accrescere/discrescere; passare/tornare).

We then did a not-very-deep mechanical dive into the guard bicorno, including how to use it to prevent an exchange, and as a feint. This included an introduction to the woman in the window drill:


We finished up our survey with the 4 corners drill: https://swordschool.com/wiki/index.php/Four_corners_drill

All of this material can be found in book form in The Medieval Longsword, as an online course here.

Capoferro Rapier

The following day, Sunday, we did a pretty thorough overview of Capoferro's rapier. We began with basic footwork:

  • passes,
  • lunge,
  • step,
  • lean

Which you can find here:

Then played Hunt the debole (to get an idea of what the sword is supposed to be doing- keeping you safe!).

We then worked through Plate 7 (stringer on the inside, thrust through the left eye):


And plate 16 (stringer on the outside, thrust to the neck):

Plate 8 (slip the leg)

Plate 10 (enter against the cut),

Plate 13 (the scannatura)

And plates 17 and/or 19, the avoidances of the right foot or waist:

We also did a pretty deep dive on the mechanics of the lunge. We didn't video the Madison seminar, but I covered the lunge in a similar way in this seminar:


We also looked at the mechanics of passing, specifically the difference between the passing foot pointing forwards or out to the side.

Then we constructed a mechanically sound seconda position, starting from first principles. I covered this in a blog post, here: Function First, then Form

We then went through my system for teaching students the basic skill of parrying with the dagger, in four stages. You can find the four stages on this wiki page: https://swordschool.com/wiki/index.php/Rapier_and_dagger_drills

And we then applied those skills in executing Plate 23:

And then had a look at murdering left-handers in Plate 38:

All of this rapier material is covered in the Complete Rapier Workbook, and in the new Duellist’s Companion 2nd edition. If you prefer an online course, you can find it here: https://swordschool.teachable.com/p/rapier

Thanks again to the lovely Heidi for organising it, Chris for introducing us all to Meyer, and to the most excellent students.

I’m just back from the International Rapier Seminar, held in Warsaw last weekend. It was an absolute blast, so the first order of business is a heartfelt dziękuję/gracias/thank you to the organisers, especially Lorenzo Braschi for inviting me (he was the very man who introduced me to the mighty porrón in Spain in 2012), and to Karol for driving all the way out to the Ryanair airport to get me, which was only marginally closer to Warsaw than it is to my house.

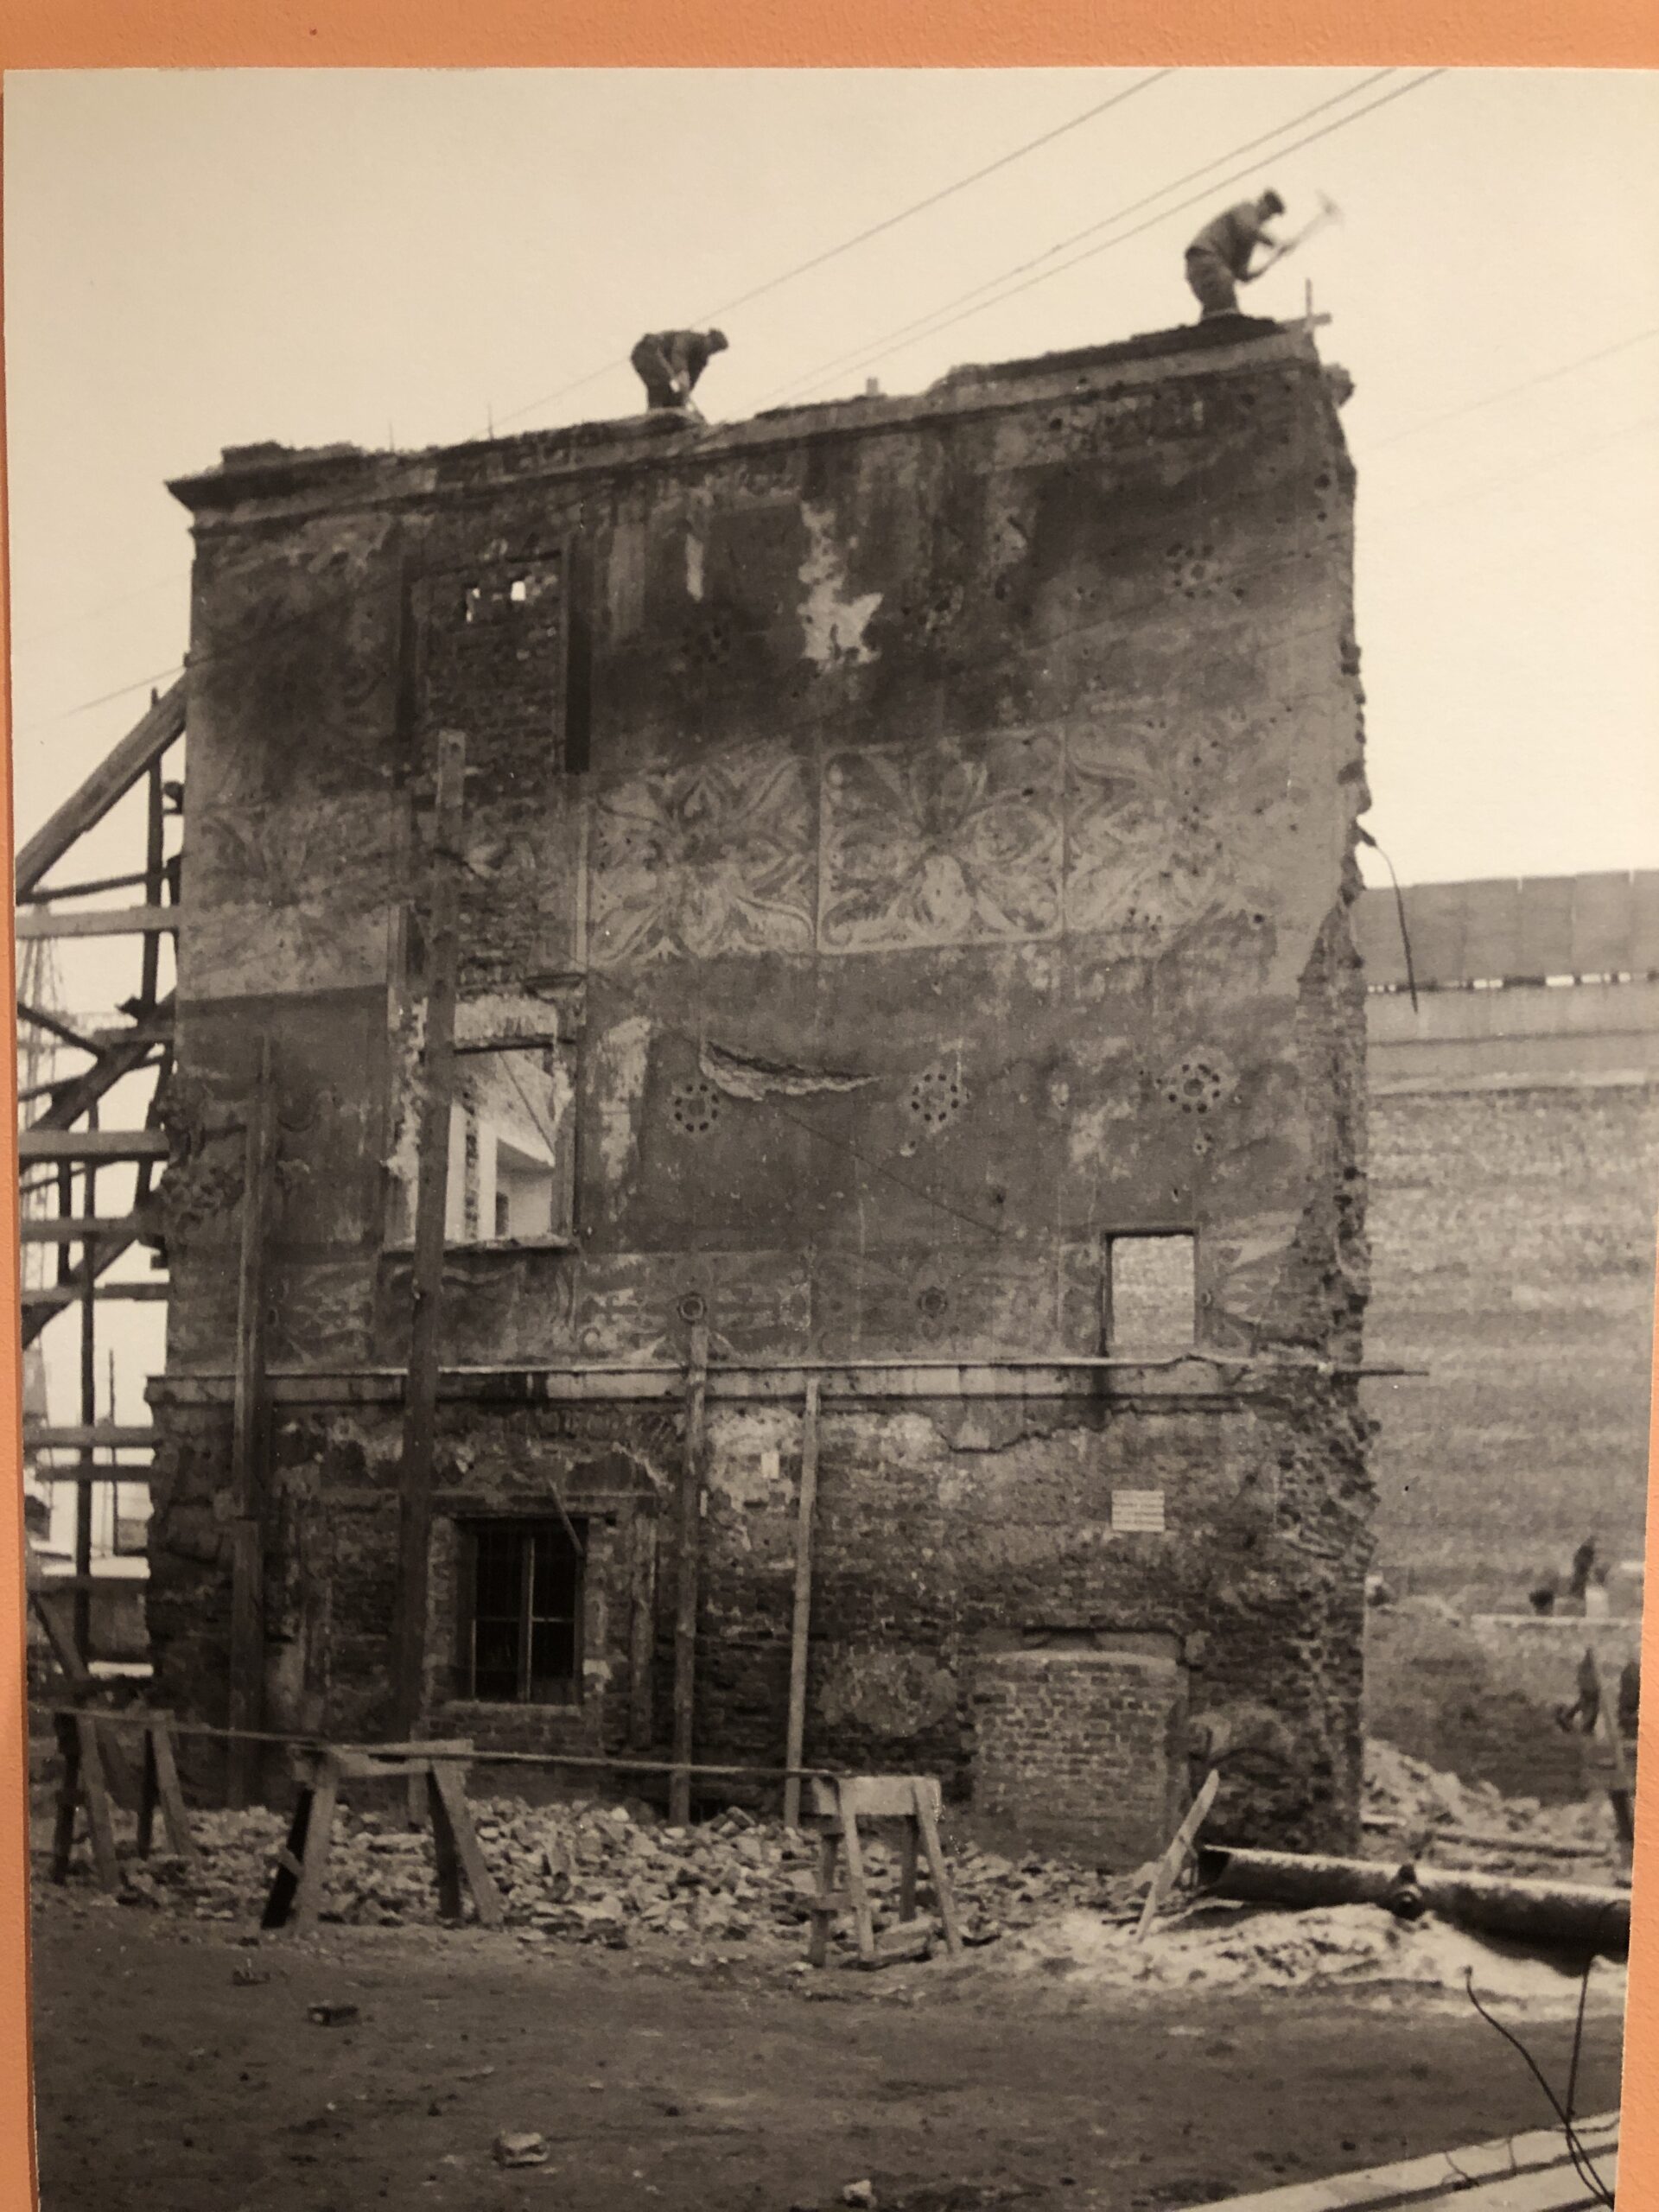
The event kicked off at 5pm on the Friday, so I spent the day in Warsaw being a tourist, mostly at the Warsaw Museum, which had a special exhibition on the reconstruction of Warsaw after the Nazi’s wantonly destroyed it (as in, 65% of the city completely levelled, 80% badly damaged) after the Uprising of 1944. I didn’t know much about the city before I got there, and it frankly blew me away. The sheer scale of the clearing and rebuilding beggars the imagination, especially when you realise it was done with picks, shovels, and horse-drawn carts, in a country ravaged by the war.

Walking around the old town, you wouldn’t immediately guess that the buildings were built 70 years ago.

The event began with a get-together, a bit of sparring and lots of chatting, and I got to meet a student I’ve been interacting with pretty much weekly since 2020 (hi Jas!). I taught two classes on the Saturday: How to Train, followed immediately by How to Teach. I can summarise them for you like so:

1. Run a diagnostic, fix the weakest link, run the diagnostic again

2. Generate the optimal rate of failure in your student/s.

Simple, yes. Easy? Not so much. But that’s why we practice, right? The classes were well attended, and I think well received. During the afternoon I dropped in and out of watching classes by the other instructors, and got to fence with Emilia Skirmuntt, she of episode 75 of the podcast. Plus a great catch-up with Alberto Bomprezzi, whom I haven’t seen since my trip to Spain in 2012, and meeting Jorge from Mexico who persuaded me to part with my proof copy of The Duellist’s Companion Second Edition.

There may or may not have been much carousing and revelry that evening…

Sunday was given over to the tournament, which had two excellent features: it didn’t occupy all the space, and I didn’t have to do any work on it. So I spent the day fencing people! Elmar, Radek (who went on to win the tournament, congratulations!), Chris, Heikki (the one Finn at the event), Cornelius, and Martin. Each bout was different, each one delightful in its own way. If I had them to give, I’d give out the special technical “this feels like fencing a specific historical system” award to Martin (organiser of Swords of the Renaissance, which I attended last year and will return to in September this year). We were both really tired (these events are exhausting), but there were moments when it felt like Capoferro and Fabris might not have been ashamed of us. Another highlight was working with Damian on grounding and mechanics. He’d asked for it in my class the day before, but we didn’t have time to go into sufficient detail. There's no substitute for working one-on-one with students.

I was too knackered by the heat to fence everyone I wanted to, so Pedro Velasco and Tomasz Kraśnicki, here’s your rain-check for my first two bouts next time!

The great thing about all the bouts, and the event itself really, is that it was all very collegial. There was plenty of competitive spirit, but none of the personality-driven jockeying for status etc. that can make fencing unpleasant. That’s down to the attendees, in part, but also to the spirit of the event itself, for which the organisers should be thoroughly applauded.

Dinner on Sunday night was a blast too; most of the attendees had gone home, but on my table at a restaurant in a square in the old town, there were 8 people, no two of them from the same country. We had the USA, UK, Denmark, Serbia, Bosnia, Finland, Denmark, and Italy represented. If I went on a bit much about flying and woodwork, then Marc, Nic, Nicole, and Vicky, my apologies. Blame the vodka! But to be fair, they did ask…

And breakfast on Monday involved an hour-long chat with Ton Puey, Chris Lee-Becker, and Pedro Velasco. I think that a huge part of the value of events like these is the unscheduled serendipitous interaction with colleagues and friends. I also found at least two new guests for the podcast whom I had never heard of before the weekend!

My main takeaways from this trip are 1) I should do more of them and 2) I need to work on my fencing fitness. My legs are killing me!

As is now traditional, the day after an event like this I'm flooded with Facebook friend requests, which is lovely, but I don't use Facebook. So, if you'd like to find me on social media, come to swordpeople.com and say hello!

Holding the sword correctly is safer

One of my students mentioned tendonitis problems in his wrist on the Swordschool Discord server this week. It’s probably caused by holding his sword incorrectly, which forces the small stabiliser muscles to do more work than they evolved for. He is by no means the first student I’ve seen with this problem.

It has been my experience that almost every sword student at any level in any style is either holding their sword incorrectly, or at the very least, there was room for improvement. This is partly due to most modern sword makers producing handles that are a bit too big (my friends at Arms and Armor have a post on this, here), or a bit too round; and partly due to most people simply not understanding how the mechanics of sword holding is supposed to work.

In essence, your grip strength and wrist stabilisation strength should be acting as back-up systems only: the sword should stay in your hand with almost no strength being used at all, and when you strike, the force coming back from the target should be routed through the bones of your hands and wrist, and thence through your body to the ground, with no need to tighten up on impact at all.

Seriously. Not at all. 

Have a look at this video of me hitting the wall target with a rapier, and bashing the tyre with a longsword. My hand is not just relaxed, it’s actually open, to demonstrate beyond reasonable doubt that grip strength is not required. 

I have been banging this drum for many, many, years now (I first posted that video in 2012!), and have written this up in many places, and posted endless video content about it, and yet still the sword world has crappy sword holding skills. This is for three reasons:

1. the sword handle is too big 

2. because this is very counter-intuitive

3. and also because most people are strong enough to fake it for a while; they think it’s correct, when actually their muscles are faking it for them. Until the pain in the first joint of the thumb kicks in. Or in the elbow. Or indeed anywhere along the chain from fingertip to toes. 

So how should you hold the sword? 

That depends on what kind of sword it is, and what you want to do with it. 

Generally, the sword is either held back in the hand, like so:

Guy Windsor Holding a sword, chambered grip


Or extended in the grip, like so:

Guy Windsor holding a sword in an extended grip


This is also how most chefs hold their kitchen knives when chopping and slicing.

Guy Windsor holding a kitchen knife slicing cucumber. Grip is extended.

There are exceptions: we do sometimes support the flat instead of the edge, like so:

Guy Windsor holding the sword thumb on flat


The sword is usually held back in the hand when it’s also held back near the body, and extended in the hand when the sword arm is extended from the body. Some longsword folk have half-understood this concept and hold their longsword in the extended grip even when the guard is chambered (such as in posta di donna). Some swords are almost always held in the extended grip; rapiers, foils, smallswords are good examples. The basic rule still applies- when holding the sword it should be supported by the bones, not tied in place by the muscles.

The extended grip does not depend on grip strength; you can perfectly well hold the sword with one finger, if it's aligned correctly, like so:


Guy Windsor holding a sword, fingers open.

I'm not recommending fighting like this, but it's worth making sure you're not depending on grip strength when holding the sword by opening the thumb, forefinger, ring finger, and little finger, and seeing what happens.

One common error is to extend the wrist, rather than extend the sword in the grip. You need to be able to distinguish between at least three positions of the hand relative to the forearm. Three-knuckle, two-knuckle, and one-knuckle. The easiest way to learn the differences between them is through “Eurythmic push-ups”. You can do them on a mat if you prefer, and you don’t actually need to do the push-up bit; just getting the feeling of the different wrist positions is very helpful.

Cocking the wrist between the ‘three-knuckle’ and ‘one-knuckle’ positions instead of allowing the sword to shift in the grip between the ‘chambered’ and ‘extended’ grips is another common cause of wrist problems.

Please pay attention, this may save you a lot of pain, as well as massively improve your general sword handling.

Holding the Longsword

I introduce the basics of how to hold a longsword in this video borrowed from my Solo Training course

Holding the Rapier

This footage from a rapier seminar I taught in 2012 goes into the correct grip for the rapier in some detail; you can watch the whole thing of course, or skip to about 22 minutes in, where we get into the grip.

If you are already having wrist problems, for any reason, you may find my Arm Maintenance course useful. It’s free, and bundled in with my Human Maintenance course. 

Creating a working syllabus is hard. Where do you start? What comes next? How do you know when you’re ready to move on to the next thing? I find it helps to remember that there is no one correct answer, because the optimum structure for the syllabus depends on its goals, and the specific aptitudes and experience of the student. 

The latest instalment of my Rapier workbook series (Rapier Part Two: Completing the Basics) contains the following technical content:

  • Plate 8: voiding the front leg
  • Plate 9: passing to attack (off-hand forwards)
  • Plate 10: dealing with cuts to the head
  • Plate 11: voiding low, and acting in contratempo
  • Plate 17: voiding with the front foot
  • Plate 18: passing to attack (off-hand back)
  • Plate 19: voiding with the waist
  • Capoferro’s three tempi (half, full, and one-and-a-half)
  • Changing direction

That is a lot of material, and hard to remember, so I used the structure of the Rapier Footwork Form to organise it. This way, by the end of this book, you will have a series of actions clearly stuck in your head, which will act as an aide-memoire for all the plates that you know (including everything in the previous book: plates 7, 13 and 16). By running through the Form at the beginning of every training session, you will cover every major action in the system, and be reminded of the areas where you are strongest, and those that need most work.

You can see the form here:

I have also included some essential repetition from the previous book, notably the discussion on safety, and advice on how to use the book, because I know from experience that some readers will ignore “you need to read part one first”, and those things must be read before training. 

Some people just want to learn how to sword fight. Others want to learn how to do the academic research side of historical swordsmanship. And some want to do both. These workbooks are obviously directed towards the “just teach me to sword fight” crowd, but I encourage all my students (and that includes you!) to at least be familiar with the primary source for your art, in this case, Gran Simulacro. 

So what is form? and what it is for? Fundamentally, form is the mechanism we use for creating a narrative of the system within the students’ brains. You can think of a form as a string of pearls. In the beginning, each pearl is just one technique or action. It’s a tiny little seed pearl. But with practise, and a broadening understanding of the Art, each pearl becomes the locus for other concepts and actions to be stored. A single action acts as a trigger for a cascade of related actions. Form is therefore a set of chapter headings, under which you can store everything you ever learn about swordsmanship with the rapier; and once you have filled out each chapter, you have an index to your entire knowledge base.

I cannot state this too strongly: the Form is just the beginning. It is not the be-all and end-all. When you write your own chapters, it becomes The Book of your rapier knowledge and skill. Once that is established you can simply run through the Form at any time and identify the weakest link. Start working on that link, using the “attached” training material, then re-run the Form to see whether what you have been working on is still the weakest link. The Form is therefore a diagnostic tool, an aide-memoire, a mechanics exercise or a guide to the system; in fact, it is the core of your practice. This workbook is about writing those chapter headings, and then filling in those chapters.

The major pitfall of this approach is that the organisation of the material in the Form has more to do with training space constraints and what felt good when designing it (“where do I want to go from here?”) than it does with any overtly logical structure. It does not, for example, follow the order of the plates in Gran Simulacro. Nor is it arranged according to difficulty. You may find yourself wanting to re-arrange things. That’s fine: the structure is (as with all forms) at least partly arbitrary. You only need to have this canonically correct if you are following my school’s syllabus and intending to grade within it. Otherwise, take this and make it your own! 

When I was a kid, I spent some time casting little lead soldiers. It was magic: you heat up the lead in a pan until it melts, pour it into the mould and wait for it to cool down, and out comes a cavalry officer, rifleman or whatever. We then had to trim off the inevitable little leaks and the rather large riser (the extra bit where you pour the metal in, called a “sprue” in the US). Then the figures were ready for painting. You can think of the Form in a similar way. The actions of the person doing the Form are moulded by the actions of the (imaginary or real) opponents, as well as by the overall training goals. As with the casting process, there are artefacts to be taken into account: little bits of metal that don’t really belong, or some turns or steps that you wouldn’t normally use but are necessary to keep the Form in the right shape. So long as you know what the Art should look like and what the applications are, or what a Royal Horse Guards trooper from 1815 is supposed to look like, the Form is useful. As soon as the mould (your understanding of which actions do what) gets sloppy, the Form becomes a shapeless, pointless mess. 

So here is a rule to be followed whenever you think about any kind of Form: 

Application first, Form second. 

We do this in class. When teaching the Form to students, we absolutely always do pair-drill (or handling drill) first, then the same actions solo, and then we add it to the Form. We never, ever, have students practising actions that they don’t know at least one application for, and we distinguish very clearly between a play or technique and a handling drill or skill-development exercise.

This post is an adapted extract from the new workbook. You can find the whole book here.

Or if you prefer learning from video classes, you should try my free Rapier Beginner's Class mini-course.

If you find the ideas here interesting, you may also like this post:

The Dragon: how to write forms or kata for martial arts training

I was recently contacted by a reader asking about teaching left handed students. It’s a common and relatively complex problem, so rather than confine my answer to an email I thought I’d post it here.

The Question

How do you teach left-handers?

Why it’s a problem

Left handers are relatively rare (about 10% of the population, including my dad and my sister), and most of the historical martial arts treatises we work with don’t say much about them. Capoferro has one plate of rapier and dagger showing how to murder a leftie:

Fiore mentions that the guard of coda longa on horseback works against right or left handers (click on the image to expand it, and you can read the text and the translation by Tom Leoni):

Perhaps the biggest section of any treatise dealing explicitly with lefties is in Jeu de la Hache, but it’s still a small proportion of the overall material.

So what’s the problem?

The problem is that many of the techniques we recreate from the sources simply don’t work the same way as shown in the books when done cross handed. In addition, right handers don’t see many left-handers, so in combat sports generally, left handers tend to be far more common at the top levels than they are in the general population. This is entirely due to familiarity. Everybody knows how to handle righties- we see them all the time. (For an interesting book that also addresses this in some detail, see The Professor in the Cage, which is well worth reading if you have any interest in martial arts…)

The question is about teaching lefties, not fighting them, so I’ll address that. (If you want my best advice for fighting left handers it’s this: fight them a lot. You’ll get better at it.)

What difference does handedness make?

In blade on blade actions, not much. Principally, inside and outside are not symmetrical [For those unfamiliar: if the sword is in your right hand, everything to the left of the blade as you see it is ‘inside’, and everything to the right is ‘outside’.] If we are both same-handed and our blades are crossed, we will both be either on the inside or on the outside of each other’s blades. But when one of us is differently handed, if you are on my inside, I’m on your outside, and vice-versa. This means that some targets are different, and the angles of attack may be different. But usually, the rules regarding how to attack remain the same. For example, I would only push your elbow if I’m on the outside of your arm. That doesn’t change; what changes is how I would get to your outside, and which of my hands may be able to reach your elbow.

In wrestling at the sword, it makes a great deal more difference.

Tricky to pull off cross-handed. Trans. by Tom Leoni.


This wrap, for instance, only works well using the opposite arm (eg left against right) and from the inside of the wrapped person’s arm. Because this is over both arms, it can be used cross-handed, but you won't get the same control of the sword arm.

Likewise this counter rarely occurs cross-handed at the longsword, because the preceding wrap would have to be done by the sword arm, which is unusual (though you can see it in I.33, f.18.v).

Ligadura sottana, 15th play of the zogho stretto. Trans by Tom Leoni


I include specific examples of techniques adapted from symmetrical drills to cross-handed versions in chapter seven of The Medieval Longsword. In case you don't have it to hand, I've extracted it for you here:

Medieval Longsword sample Cross-handed

So that's the problem. What's the solution? There are several approaches you can take:

Approaches to the problem:

1) make everyone train right handed. I think this is a bad idea if your goal is to produce great practitioners, but if your goal is to perfectly reproduce the plays of a specific treatise, in which everyone is right-handed, then it makes sense. When Christian Tobler began researching German medieval sources, he switched from his natural left handedness to do everything right handed because it was much easier than converting everything.

2) make everyone train both sides. I think this is advisable up to a point- I would expect all my senior students to be able to do all our basic drills and actions with either hand, and any professional instructor to be able to demonstrate anything within their art with either hand. But it’s probably not the best way to train beginners.

3) create specific ‘cross-handed’ variations of every major drill or exercise you use. I think this is essential. The basic drills usually assume two right-handers. Two left-handers can do exactly the same drill, it’s just mirrored. The problems only start when there are a right hander and a left hander training together. I include set forms for the cross handed version of every basic drill in my syllabi.

Advice to instructors:

  • If your syllabus is lacking cross-handed drills, create them. You can do this by setting up the drill and seeing where you (as a lefty) get stuck. Then following the basic principles of the art, solve the problem. When the problem is solved, incorporate that solution into the ‘cross-handed version’.
  • When you have a lefty in class, it’s your job to make sure that they learn the standard form of the drill (i.e. with a fellow left hander, which may have to be you), as well as the cross handed forms. Also, you should take advantage of their presence to accustom your other students to dealing with cross-handed situations.
  • As the instructor, you can always require the senior students to reverse their handedness (so lefties become righties, and vice versa), which gives  everyone else the chance to face the less-common situation.
  • Start with the simplest drills- make sure that you can do all the solo drills in your syllabus with your left hand, and can see what they should look like in your students when they are left handed.
  • Set up a basic pair drill, and see what happens. At any given point, the left-hander should be behaving normally for them. Never ask them to attack differently or switch hands for the convenience of the right hander (unless they are very experienced and the righty is a beginner).

I hope that's helpful! Feel free to make any suggestions or ask questions in the comments below.

For more on how to teach, you may find these posts useful:

How to get started teaching historical martial arts

How to teach a basic class

Perhaps the most famous fencing treatise of the 1600s, Ridolfo Capoferro's Gran Simulacro is a wonderful book, and an essential read for all fencing scholars. Characteristically, he spells his name as both Capoferro, and Capo Ferro, in the book itself; just one of it's many interesting quirks! It covers fencing theory, rapier alone, rapier and dagger, rapier and cloak, and rapier and shield. You can download your free copy of the treatise from here.

You are welcome to the RAW image files too (at about 25mb per image), just contact spada.press and we'll arrange to share them with you. The book is free, but you are welcome to drop some money into the (virtual) tin; once the book has raised enough money to pay for production costs, we will gladly produce an affordable printed facsimile. Please note that this book is in Italian.

Further reading:

Translations: William Wilson and Jherek Swanger (free):  Capoferro

Tom Leoni, The Art and Practice of Fencing.

ed. Jared Kirby: Italian Rapier Combat

For an instruction manual on how to fence in Capoferro’s style, please my The Duellist’s Companion.

Last weekend I attended the excellent Smallsword Symposium. I am unusual amongst HEMA instructors in that I do lots of different styles; Armizare, of course, but also I.33 sword and buckler, Capoferro rapier, and even the glorious smallsword. The smallsword was my first historical fencing love, way back in the early nineties, and the first treatise I found and distributed was Donald McBane's Expert Swordman's Companion in the National Library of Scotland. My first two books, The Swordsman's Companion and The Duellist's Companion  were named in its honour.

Anyhow, I digress. The point is, smallsword is bliss, and much under-appreciated in the HEMA world, so it was an especial pleasure to attend an event given over wholly to its elegant viciousness. The event was well run, and well attended, with people coming from Norway, Canada, Germany and even Ipswich, as well as the local contingent from (mostly) the Black Boar Swordsmanship School, which organised the symposium. The Black Boar was founded by two ex-DDS members, Phil Crawley and Ian Macintyre, who I had a hand in training back in the bad old days. My (fencing) kids are all growed up! And having kids of their own…

The format of the event was interesting; just two tracks, beginning with a very basic introductory class for newbies, well taught by Sue Kirk, with a more advanced ‘let's get cracking with a bunch of skills training' class run by Phil running at the same time. This got everybody off on the right foot, and paved the way for the classes that followed. These were mostly ‘have a go at this cool new system' type classes, such as Tobias Zimmerman's survey of Schmidt, and Ragnhild Esbenson's survey of McBane. There were also a few concept classes, such as Milo Thurston teaching proprioception using blindfolds, Martin Dougherty (author of several swordy books) teaching attention to technical detail, and my own ‘how to find and fix any technical problem' class.*

The event included a tournament, and I must say it was amazingly well organised. Simply, the contestants are randomly split into four pools and told to establish a winner in 90 minutes by whatever means they agree on. Absolutely no top-down requirements, just tell us who won. Then the four finalists fence off in pairs. The two losers fight for third place, the two winners for first and second. It worked incredibly well, and I saw some lovely smallsword fencing.

One additional highlight for me was meeting Marco Danelli, the swordmaker. I have often been asked about his swords, and have had to reply ‘they look nice in the pictures but I've never handled one'. Now I can say “dear god, buy one!” No wonder he has a two-year waiting list. I also got to see a couple of Andrew Feest's swords, though sadly not Andrew himself, and oh my, they were both extremely pretty and handled delightfully. Mm-mmm, swordmaking is alive and well in Brighton, I can assure you.

All in all, an excellent weekend, and I look forward to coming back next year. On the Monday we went to Glasgow to handle antique swords, but that's a story for another blog post. One of the swords had HORNS! Stay tuned…

*For the benefit of those that were there (or even those that weren't), let me briefly summarise my class:

  1. Run a diagnostic, find the weakest link. E.g. I'm vulnerable to attacks below the sword arm.
  2. Fix the weakest link, using the method below.
  3. Run the diagnostic again.

The method for fixing the weakest link goes like this:

  1. Distinguish between technical and tactical problems. Technical = I did the right thing but it failed. Tactical = I did the wrong thing. This was a technical class so this process is for technical problems.
  2. Model the problem: recreate it with a partner.
  3. Slow it down until you can get the action right.
  4. Gradually increase the pressure/complexity/difficulty until it starts to fail.
  5. Train it at the level where it works 8-9 times out of 10. 10 out of 10, increase pressure; 7 or less, reduce pressure.
  6. If you can't get it to work, then analyse it in terms of a) timing b) measure c) grounding/structure d) flow/movement. The weakness will be in there.

This class was largely unfamiliar with grounding so we covered that in some detail, with the net result that most of them shifted the way they hold their swords. Success!

In the last 15 minutes we looked at applying the process to tactical problems. It's not much different, it just requires selecting the correct action. For example, learning to identify a feint.

  1. Model the problem: recreate it with a partner.
  2. Slow it down until you can use the correct action (in the case of a feint, a second parry).
  3. Gradually increase the pressure/complexity/difficulty until it starts to fail. Complexity is created by the ‘coach' in the drill either feinting or doing a real attack, forcing you to adapt your actions to theirs.
  4. Train it at the level where it works 8-9 times out of 10. 10 out of 10, increase pressure; 7 or less, reduce pressure


A spot of rapier and cloak in the morning?

I have the enormous privilege of owning an original copy of Salvatore Fabris’s Sienza e Pratica d’Arme, printed in 1606. I bought it from Sr. Roberto Gotti, of Brescia, in 2014. It is in incredibly good condition, and an excellent, clean print. It is still in its original binding. The value of the book comes from two things: the information it contains, and the artefact itself. I own the artefact, it is mine, mine, mine, and woe betide anyone who tries to take it from me. But I believe the information it contains belongs in the public domain. This book is yours. So I asked my friend Petteri Kihlberg to photograph it, and I am releasing those photos (with his permission) free and with no strings attached. If you choose to use them for some commercial purpose (such as printing an edition for sale), then I ask as a matter of courtesy that you give credit where it’s due, but I do not insist on it. I've set it to “pay what you want”, and would be grateful for any donation you choose to give; the more money I have, the more fencing treatises I'll buy, all of which will go online for free.


I want this!

I own this book, but the information it contains is part of your birthright as a human being. I hope you will enjoy it, share it, and make something beautiful with it.

Please share this post so that everyone who wants a copy of the book can get one.

And don't miss my other free books! Marozzo's 1568, Girard's 1740, Seven Principles of Mastery, and many more.

Rapier Length: responding to criticism from the internet

Rapier length. Guy Windsor's book The Duellist's Companion with two rapiers.
Image courtesy of Elisa Hyvärinen

As you may know, I am in the process of videoing everything we do in the salle, and putting it up online for free. This project is called the “Syllabus Wiki“. One of the many benefits of this is that informed commentators can see what we are doing and make constructive criticisms, which leads to improvement in our interpretations and methods. Not all criticism is well-meant, or well-written, but I do my best to stick to the facts, and ignore any agenda the critic may have. The truth of the Art should outweigh any other factor.

We have been putting a lot of Capoferro rapier material up lately; we have recently uploaded the last of the plays of the sword alone, shown on Plate 20. Bear in mind that these videos are intended to show a co-operative, choreographical rendition of the contents of the plate; they do not go into hard and fast applications of the lessons of the plates, or show anything against a non-compliant opponent.

One anonymous blogger, who goes by “Grauenwolf”, has recently taken issue with quite a few of our videos, and in some cases he has a point. [There is actually quite a lot of interesting material on his blog, which has been going since 2008.] I would find the criticisms more useful if they were accompanied by video examples of Grauenwolf himself doing the same actions his way, but at least he is quoting from the sources, and seems to truly care about historical accuracy.

One such critique is here, regarding rapier length, in which he states his opinion that we are using blades that are much too short. He doesn’t actually tell us how long our blades should be, but does quote from Capoferro’s passage (using Wilson and Swanger’s translation without attribution):

“Therefore the sword has to be twice as long as the arm, and as much as my extraordinary pace, which length corresponds equally to that which is from my armpit down to the sole of my foot.”

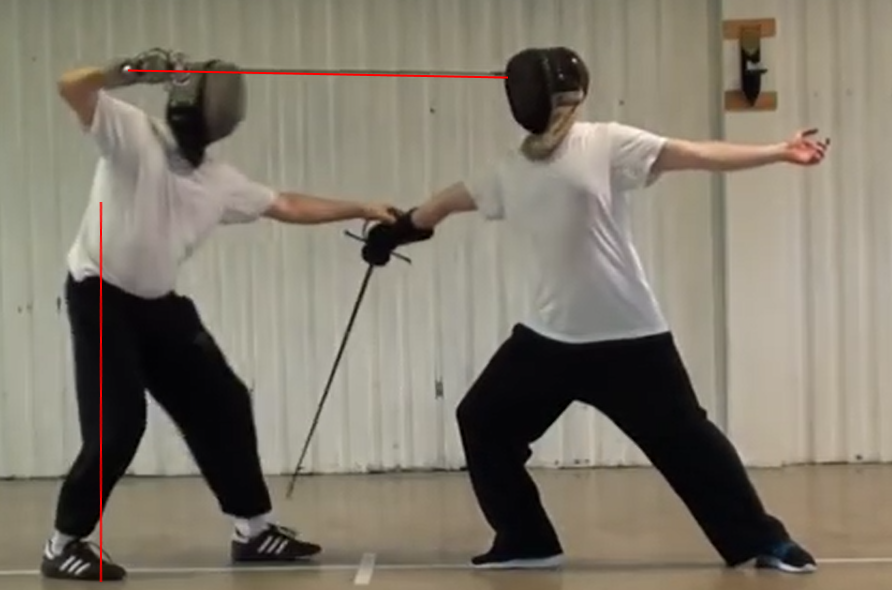
He includes this screenshot from our video (again without attribution, but at least in this case anyone who checks the video link will find out whose video it is), with lines added to indicate his point of disagreement (if only all disagreements were so clearly stated!).

Rapier length: screencap from Plate 20 showing lengths

As you can see, Henry's sword is clearly shorter than the distance from his armpit to the floor. But the passage is not quite as straightforward as all that. The arm is presumably measured from the armpit; but to the wrist, or the fingertips? The “extraordinary pace” is measured from where to where?

The only apparently simple measurement is from armpit to the sole of the foot, presumably while standing (and incidentally is the same length of sword that Vadi recommends). The problem is that it would make for a sword that is much longer than most surviving examples, and much longer than the ones that are apparently illustrated. I have addressed the problem of rapier length in print twice before, in The Duellist’s Companion, and in Choosing a Sword. To quote from the latter:

In my opinion, Capoferro’s system works best with a sword that weighs between 1kg and 1.6kg (2.0—3.5 lb), with the point of balance between 6 and 15 cm (2.5—6 inches) in front of the crossguard, a complex hilt that allows you to put your forefinger over the crossguard safely, and a blade length from crossguard to point of at least 97 cm (38”) (for short people), up to a maximum of about 114 cm (45”).
Capoferro himself tells us, in Chapter III: The Division of Fencing That is Posed in the Knowledge of the Sword, section 36:
“Therefore the sword has to be twice as long as the arm, and as much as my extraordinary pace, which length corresponds equally to that which is from my armpit down to the sole of my foot.” (Translation by William Wilson and Jherek Swanger).
I have never met anyone for whom those three measurements were the same, and in my The Duellist's Companion I worked them out like so:
“My arm is 52 cm, shoulder to wrist; my lunge about 120 cm from heel to heel, and it is about 140 cm from my foot to my armpit when standing. When standing on guard, it is about 115cm from foot to armpit. When in the lunge, it is about 104 cm from foot to armpit. Also, it is not clear whether he refers to the length of the blade, or of the whole sword.
If we resort to the unreliable practice of measuring the illustrations, in the picture of the lunge, the sword blade is 73 mm, the arm from wrist to armpit 37 mm, and the line G (front heel to front armpit) 55 mm. The distance between the feet is 67 mm.
So, the measurement most consistent with the text would appear to be the length of the arm, from wrist to armpit, as it approximately correlates to half the length of the blade.
 Given this as a guide, my blade ought to be 104 cm or about 41” long from the guard to the point.”

So there are three critical measurements:

  1. the length of the arm
  2. the length of the “extraordinary pace”
  3. the length from the armpit to the sole of the foot.

Henry, the chap in the illustration, has the following measurements:

  • Arm from armpit to wrist: 49cm. From armpit to fingertip, 66cm.
  • In guard, armpit to sole of the foot: 122cm; standing, 150cm.
  • His lunge is 100cm heel to heel, and 130cm from the back heel to the front toes.
  • His sword has a blade length of 107cm (a touch over 42”), and a total length of 122cm.

For what it's worth, modern manufacturers of rapier blades tend to offer them between 40 and 45″ (102cm- 114cm); a 150cm rapier would have a blade of about 135cm, or 53″.

So, given these measurements, I would be very interested to hear how long Henry’s sword should be, based on Grauenwolf's interpretation. I would also like to know Grauenwolf’s measurements, and the length of his sword, and see how he has solved the knotty problem of reconciling three quite different measurements.

[“Grauenwolf” goes on to criticise the way we beat the sword, apparently completely oblivious to the fact that Janne is co-operating in a way that the combatants illustrated in Gran Simulacro are not, and also oblivious to the purpose of the video. But that’s a whole other story. At least our videos are doing what they are intended to do: making it easier for people to get to grips with the source material; in this case, providing the impetus for a whole list of blog posts. Sure, I’d rather they were a bit more constructive, but anything that gets the sources talked about has to be a good thing.]

I have a strict policy on the internet: I never link to bad things. In other words, if somebody has annoyed or disgusted me, I don't reward them with traffic. So you might wonder why I am sending traffic Grauenwolf's way. Simply, it's because

a) I'm not annoyed or disgusted; if nobody ever disagreed with me, I'd never learn anything;

b) his blog has a lot of good and interesting stuff on it;

c) while I obviously don't agree with him on this point, and think he could be better at attributing his sources, I think his critique is an attempt to serve the Art, not to advance a personal agenda, and

d) I really do want to know how he solves the problem of the three incompatible measurements.

We have an entirely different issue regarding longsword length. You can find that discussion here.

How to hold the sword is another matter too. You can find that discussion here.

We often duck and dive to avoid something, when our interests would be better served by meeting it head on. Sometimes it's better to just take the hit.

By the time they are a few weeks old, most babies have mastered the art of the double-dump. Inexperienced parents react to the first load: a stinky nappy (diaper for my American friends) requires immediate attention. So we jump up, change the nappy, and then with a smug little grin, the infant fills the fresh one too. With experience comes patience; leave the nappy on for another 5 or 10 minutes, just to make sure she’s done, then change it.

My eldest daughter was a master at this pretty much from birth. On one particular occasion though, aged about 3 months, she excelled even herself, with a perfectly timed double-dump. I was changing her nappy, on the changing table in her room. With her legs in the air, all cleaned up and right before the clean nappy went on, she let go a squirt of liquid baby-shit, right at me, from a range of less than a foot.

Only my trained swordsman’s reflexes saved me.

There is a technique in swordsmanship, which is especially common with thrust-oriented weapons like the rapier or smallsword, of swinging your back leg round behind you to void your body out of the way.

Ridolfo Capoferro calls it the “scanso della vita”,  the avoidance of the waist.


(You can see the action on video on my School's Syllabus wiki page here.)

Domenico Angelo calls it the “Demy Volte”, or half turn.

I have been training to use this kind of avoidance for many years, but have only ever pulled them off in freeplay a handful of times. It’s really hard to get the timing just right, and it depends on a full, deep attack from the opponent.

But somehow, my deep lizard brain reacts better to a stream of shit than it does to a sword-thrust, and even at that close range, I effortlessly, immediately, and perfectly, avoided the attack, while keeping my right hand on the baby. (You never, ever, leave a baby on a changing table without contact. Because if you do, that’s the moment they’ll learn to turn over, and roll themselves off.) Not a drop of the vile stuff touched me. No, it went everywhere else but on me. At that elevation, under that much pressure, it travelled about 6 feet.

So instead of only having to change my t-shirt, I had to clean the floor, the wall, and the armchair.

I should have just taken the (s)hit.

Search

Recent Posts

Categories

Categories

Tags