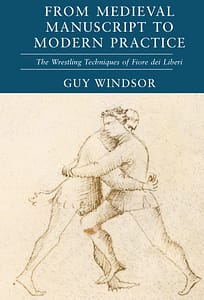
I’m delighted to let you know that From Medieval Manuscript to Modern Practice: the Wrestling Techniques of Fiore dei Liberi is now out on the Swordschool shop! For the next week only, you can get 10% off the hardback, paperback, and ebook here. Use the code wrestle10 at checkout to apply the discount.
This book is the academic basis of my interpretation of Fiore’s wrestling plays, following the format I pioneered in the first book to come out in this series, From Medieval Manuscript to Modern Practice: the Longsword Techniques of Fiore dei Liberi.
I start at the very beginning, and provide a transcription and translation of the full introduction from the Getty Manuscript, then for each play, I provide the drawing from the manuscript, transcribe the text, translate it, and interpret it, with a video clip of the action in practise. The book also includes an essay by Jessica Finley comparing the Italian wrestling with German medieval wrestling, and a bonus section where I transcribe and translate the wrestling plays from the mounted combat section.
The book provides the “what” and “why” of Fiore’s wrestling plays. For instruction in how to train Fiore’s wrestling, you will need my online course which I created with Jessica Finley, so I have also discounted that by 45%, here.
For an academic, it is the best feeling in the world when the ground you have built a mansion on starts to tremble. (Less so for an architect, I’d imagine.) I had that experience on my recent trip to the Panoplia Iberica where I finally met Dario Magnani in person. He runs the THOKK gloves enterprise, and is a keen Fiore scholar. We talked for literally hours about the most minute details of our interpretations, starting with his take on the famous “three turns of the sword”. It was so much fun I got him onto my podcast to revisit the topic, which you can hear here:
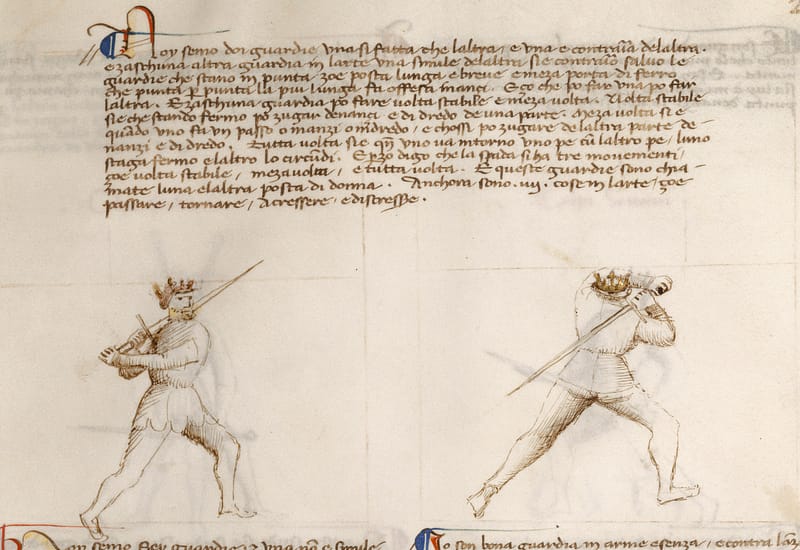
I’ll go through the passage first, then describe my current interpretation of it, then his take on the same text, and then sum up. We’re talking about folio 22 recto from the Getty manuscript. I’ll quote the transcription, translation, and interpretation from pages 116-117 of From Medieval Manuscript to Modern Practice: The Longsword Techniques of Fiore dei Liberi.
The text reads:
Noy semo doi guardie, una si fatta che l’altra, e una e contraria de l’altra. E zaschuna altra guardia in l’arte una simile de l’altra sie contrario, salvo le guardie che stano in punta, zoe, posta lunga e breve e meza porta di ferro che punta per punta la piu lunga fa offesa inanci. E zoe che po far una po far l’altra. E zaschuna guardia po fare volta stabile e meza volta. Volta stabile sie che stando fermo po zugar denanci e di dredo de una parte. Meza volta si e quando uno fa un passo o inanzi o indredo, e chossi po zugare de l’altra parte de inanzi e di dredo. Tutta volta sie quando uno va intorno uno pe cum l’altro pe, l’uno staga fermo e l’altro lo circundi. E perzo digo che la spada si ha tre movimenti, zoe volta stabile, meza volta, e tutta volta. E queste guardie sono chiamate l’una e l’altra posta di donna. Anchora sono iv cose in l’arte, zoe passare, tornare, acressere, e discressere.
We are two guards, one made like the other, and one is counter to the other. And [with] every other guard in the art one like the other is the counter, except for the guards that stand with the point [in the centre], thus, long guard and short, and middle iron door, that thrust against thrust the longer will strike first. And thus what one can do the other can do. And every guard can do the stable turn and the half turn. The stable turn is when, standing still, you can play in front and behind on one side. The half turn is when one makes a pass forwards or backwards, and thus can play on the other side, in front and behind. The whole turn is when one goes around one foot with the other foot, the one staying still and the other going around. And so I say that the sword has three movements, thus stable turn, half turn, and full turn. And these guards are called, one and the other, the woman’s guard. Also there are four things in the art, thus: pass, return, advance, and retreat.
Let me unpack this:
1. The two guards shown are both posta di donna. One is shown forward weighted, the other back weighted. I interpret the difference between them to be a volta stabile (more on that later).
2. Any two guards that are alike can counter each other.
3. Except for guards that have the point in the centre line (longa, breve, and mezana porta di ferro; more on those in the next section). This is because the longer sword will strike first. Here I’m translating punta as point (stano in punta, stand with the point), and thrust (punta per punta, thrust against thrust). The meaning is obvious whichever way you translate it though: don’t stand with your point in line against someone else who has their point in line unless you have the longer sword.
4. Any similar guards can do what the guards they are like can do.
5. Every guard can do the volta stabile and the meza volta. (I use the Italian terms for technical actions, guards, etc. where possible. Refer to the glossary [link] if you need it.)
6. The volta stabile: I interpret stando fermo, standing still, to mean without stepping, or moving a foot. As I do the volta stabile, the balls of my feet stay on the same spot on the ground. It makes no sense for a turning action to involve no movement at all, so standing still cannot mean literally ‘not moving’.
7. The meza volta: this is a passing action, forwards or backwards. I interpret that to include a turn of the hips and body, so you go from one side to the other.
8. The tutta volta: here again we have a ‘fixed’ foot, that, unless your legs are made of swivel-joints (top tip: they’re not), must at least turn around itself for the action to occur. This supports my reading of stando fermo above. Simply, this is whenever you pivot on one foot by turning the other one around it. There is a video of me doing these three movements linked to further on in this chapter.
9. The sword also has three movements: stable turn, half turn, and full turn. Unfortunately there is no further discussion of this, and these terms simply aren’t used in the rest of the book. Fiore will tell us to ‘turn the sword’, for instance in the play of the punta falsa, on f27v, but never with the qualifiers stable half or full. So I simply do not use these terms to apply to sword actions. Other instructors and interpreters do, but you should be aware that there is no evidence supporting any one interpretation of these turns over another.
10. In case you missed it the first time: both these guards are posta di donna. Both of them. Got that?
11. There are four things in the art: pass, return, advance and retreat. See the video: three turns, four steps: https://guywindsor.net/lgg01
Okay, so that’s the current state of affairs, and it accords with what most Fiore scholars I know think of the three turns.
Dario’s reading is different though. In essence, he thinks that the volte Fiore is describing here are specifically the turns of the sword. Or better, the movements of the sword.
In other words: a volta stabile is what you can do moving the sword forwards and backwards while standing still. For example, thrust from breve to longa without stepping at all.
A meza volta is what you do with the sword when passing forwards or backwards, and the sword goes from one side of the body to the other. This could be a blow, or just changing guard.
A tuta volta is what you do with the sword while turning one foot around the other.
This makes sense for the following reasons:
1. Why would footwork come between the sword in one hand and the sword in two hands? Surely if this was meant to be a purely footwork description, it would be earlier in the manuscript.
2. The volta stabile as we do it as a footwork action cannot reasonably be described as ‘standing still’. It took some wrangling to get it to apparently mean that (as you can see in points 6 and 8 above).
3. The line “And so I say that the sword also has three movements, thus stable turn, half turn, and full turn” can be read as a summary of the preceding sentences, not an application of footwork actions to the sword. The “also” there doesn’t come from “anchora”, it’s more pleonastic: it comes from E perzo digo che la spada si ha tre movimenti, zoe volta stabile, meza volta, e tutta volta. That bit “la spada si ha” literally means “the sword it has”. There’s really no “also” in that sentence, thought I’m not alone in inserting one: Leoni translates it as “the sword also has” (Leoni and Mele, Flowers of Battle vol. 1 page 252). Drop the questionable “also”, and the sentence reads as a summarising of the preceding three turns as turns of the sword.
4. Volta has many meanings and shades of meaning. You can find literally dozens of meanings for it on pages 1000-1002 of Battaglia’s dictionary, online here: https://www.gdli.it/sala-lettura/vol-xxi/21 Dario’s contention is that these actions don’t have to be read as specifically turning actions (which allows for a simple thrust from breve to longa to be a ‘volta’). To be honest, that’s the hardest part of this for me- I haven’t found a solid linguistic reference to justify a non-circular interpretation of the word, though the expression “dai volta”, lit. ‘give turn’, means “get a move on”.
It is very convenient to translate words that may have many meanings into simple, specific, and concrete technical actions. The volta stabile then gets to be one simple thing, easy to explain and teach, rather than a class of things (what you do with the sword while standing still). But this can be a false sanctuary. Likewise with the final sentence of this troublesome passage: “Anchora sono iv cose in l’arte, zoe passare, tornare, acressere, e discressere. Also there are four things in the art, thus: pass, return, advance, and retreat.”
These have long been interpreted by me and just about everyone else as passing forwards, passing backwards, stepping forwards, stepping backwards.
We know from the definition of the meza volta that ‘passare’ means to pass forwards or backwards. What is ‘tornare’ then? It means return, and when we see it in action, such as in the defence of the dagger against the sword thrust on f19r, “Lo pe dritto cum rebatter in dredo lu faro tornare”, it isn’t a pass at all: it’s the withdrawal of the front foot (see From Medieval Manuscript to Modern Practice pages 44-47 for the transcription, translation, and video).
Likewise the discrescere that we find on f26r when we slip the leg against a sword cut; it’s not a step backwards; your back foot doesn’t move.
So our neat classification of footwork actions starts to fail.
So is this passage, the beginning of the sword in two hands section, all about how the sword moves? That would not be a stretch. And for sure the volta stabile is not a great big movement of the body. I’ve started calling that movement (which is still a fundamental part of the art) a “volta stabile of the body”.
I’m not sure where I stand on all this yet. I’m convinced of one thing though: it’s past time to return to the assumptions that I have based my interpretations on and work through them with ever-closer attention to the text.
And if you listen to the podcast episode, you'll hear the moment when I'm convinced that the “also” has to go!
There’s a lot of doom and gloom going around at the moment. As the pestilence has subsided a bit, we’ve got war and famine instead. If you’re feeling a bit overwhelmed and crap, it’s not your fault. But I have one key idea and two practices that may help.
The key idea:
Your experience is created by your external circumstances, and your reaction to them.
You may not be in control of the first, but you can be in control of the second, at least up to a point.
For most people there are limits; no amount of sang-froid will help in some situations, and it’s possible to be miserable in paradise.
But for most of us, most of the time, even when we are faced with circumstances beyond our control, we have some latitude around how we respond to them.
The first rule is: whoever stays calm longest wins.
The second rule is: focus on your area of control.
And the third and final rule is: your negative emotional state doesn’t help anyone, even you.
Let’s imagine you’ve behaved badly (shockingly unlikely I know, but this is a thought experiment). Feeling guilty about it doesn’t affect the person you’ve wronged- but making amends might.
Or let’s imagine someone has behaved badly towards you (something everyone has experienced at some point). Being angry or miserable as a consequence doesn’t change what happened, and if the action was deliberate, it’s also helping your enemy reach their goal.
The Practices
I think we can agree that being able to control your response to circumstances is a superpower. The primary skills involved are remaining calm (i.e. controlling your state of physiological arousal), and choosing what your mind dwells on. The practices I use to develop those skills are breathing exercises and meditation.
They go together very well: a lot of breathing exercises are meditative, and a lot of meditation styles involve breath work.
Here’s a very simple example for you. It will take about a minute.
Generally speaking, when your exhale is longer than your inhale, your system calms down (i.e. it stimulates the parasympathetic nervous system). And when you are paying attention to your breath, you are by definition not paying attention to the thing that is bothering you that is beyond your control.
Take a moment, and do one slow inhale, and then breathe out as long and slow as you can.
Now try that again, and focus on the feeling of the inhale, and the feeling of the exhale.\
How do you feel?
Told you it was very simple!
I’ve been studying these things for a long time (I was taught my first breathing exercise in I think 1990), and I have courses on breathing and meditation. If you are already enrolled in either course, or the Solo Training course, or the Mastering the Art of Arms subscription, you already have access, so should maybe go do some practice, or skip ahead to the podcast announcement.
But if you don’t have access to the courses yet and would like to, I’ve dropped the prices to make them super-affordable. Because almost everyone is struggling with the inflation and cost of living crisis, and this is the stuff I have that is most likely to be helpful.
The usual price is $129 but you can get it for $25 with this code: JANUARYDESTRESS
Correct sales practice is to create a sense of scarcity to increase demand by putting a time-limit on the sale (as I usually do, because it massively increases sales), but the last thing we need right now is more scarcity, so I’m not going to. Those codes expire in about three years!
It is also normal practice to bombard you with reminders, testimonials, etc. to persuade you to part with your cash, but again it seems not a kind thing to do right now. If the courses aren’t a no-brainer purchase for you, don’t buy them.
But, for those of my readers and students currently sitting on glorious piles of cash, feel free to either pay full price, and/or buy some other courses or books of mine, I’d appreciate it.
There is a ton of jargon in most specialised fields, and historical martial arts are no different. A smallsword fencer cares about the difference between a colichemarde and a spadroon; falchion folk distinguish between messer, storta, and hanger. The same is true of academics who study old books and ways of writing (palaeographers. Not to be confused with palaeontologists,who study fossils). The historical martial arts world and academia overlap in many ways, and it’s useful to be able to speak a bit of academese when discussing our work, so I’ve put together an explanation of the more common academic expressions used in our field. The words in bold are the ones I’m defining, and you can find an alphabetised glossary of them at the bottom of the post. Pretty much every word in the list is the gateway to an entire universe of bookish geekery, and more than worthy of an entire post in its own right, so I have provided links to more extended discussions of them in case you have time on your hands. I have manfully resisted getting sucked into the etymology of these words (did you know that “book” comes from the proto-Germanic word “bokiz”, or beech (as in the tree), because beechwood was used for carving words into? Did you want to know? Ok, back to the topic…)
This list is a work in progress- if you think there are words to add, please do email me to let me know, or post the word in the comments below. We're already at 38 from the original 33!
Let’s start with something that should be obvious, but isn’t. What is a ‘book’?
In the Bible, a ‘book’ is a collection of writings attributed to one author, or a major chapter heading. The Book of Genesis, for instance, or The Book of Job. The Bible itself is (we would say) a ‘book’, which is divided up into ‘books’. If the Bible is presented in a single volume, it is a single physical book-like object. Fabris’ Scienza d’Arme comprises “book one” and “book two”, but has always been published in a single volume.
Things get even more complicated when we’re talking about manuscripts. A manuscript is a text that has been written by hand. It’s usually abbreviated as ms or MS, and plural mss or MSS. It could be written on paper, vellum, or anything else, but if it’s written by hand it’s a manuscript. A shopping list scrawled in biro on the back of an envelope is a manuscript. My gorgeous first edition of Capoferro in the photo below is not a manuscript- it was printed in 1610.
Because they are produced by hand each manuscript is different, so you can have a single treatise (a treatment of a subject in depth- I’ll define it further later on) that exists in different forms, such as the four quite distinct versions of Il Fior di Battaglia by Fiore dei Liberi. Each version is of course ‘a book’, bound in a single ‘volume’ but the ‘treatise’ presented in each volume is somewhat different.
If the manuscript is illustrated, it has drawings in it. Most historical martial arts manuscripts are illustrated. But often not illuminated. The difference is, an illuminated manuscript is illustrated in colour, with gold and/or silver leaf. Fiore’s Getty ms barely qualifies as illuminated- he uses gold leaf for the crowns and garters (and silver leaf for the sword blades in the Morgan ms), and the capital F at the very beginning is illuminated too.
A handy rule of thumb: illustrated mss have drawings, illuminated ones are in colour. Text that is written in red (such as chapter headings, or indeed the names Fiore gives to his guard positions) is called ‘rubric’ which these days has come to mean a class or category, because of how red text was used in many medieval mss.
Vellum, or parchment, is a kind of rawhide, usually made from calves or goats, scraped clean, dried, and variously treated. Many but not all manuscripts that have survived from the middle ages were written on vellum.
In the earliest days of writing on something other than clay, wax, or stone, writings on parchment, paper, or papyrus were rolled up into a tube, called a scroll. Then in about 300 AD some bright spark thought they’d fold the sheets in half and stitch them together along the fold, like a modern book. These early books are called codices, singular ‘codex’. It’s got everything to do with how they are made, and nothing at all to do with their content (they do not usually deal with code).
With the advent of pages came the knotty problem of how to number them. In a modern book we tend to number the first right-hand page 1, the other side of it 2, the next one 3, and so on. In manuscript studies we tend to call the first sheet ‘folio 1’. The side that is up when the page is on the right is ‘recto’, and the other side is ‘verso’. So, folio 1r is the recto side of the first folio. “As we see on f27v” means “as we see on the verso side of folio 27”. Numbering pages by folio is called ‘foliation’.
It doesn’t help matters that ‘folio’ also refers to the size of a volume.Books come in various sizes, which are pretty standardised these days. But historically, if you take one sheet of vellum, the size of which is determined by the size of the animal it grew on, and fold it in half, you get a ‘folio’. If you fold it in half again, you get a quarto. One more fold, and you get an octavo. The Getty manuscript of Fiore dei Liberi’s Il Fior di Battaglia is a ‘folio’. Vadi’s De Arte Gladiatoria Dimicandi is an octavo. This matters because vellum is very expensive, and by folding it smaller you could produce the book in a smaller size using less vellum, saving a lot of money. The size of the book tells us something about how much money the author or publisher had to spend on it. The quality of the handwriting and the extent of the illustrations, and the decoration on the cover also tells us a lot- some very expensive books were small to fit in a pocket, not to save money. But in general, smaller=cheaper.
It doesn’t stop there- the next size down is “duodecimo” (McBane’s Expert Sword-man’s companion is a good example), and it continues down to sexagesimo-quarto! You can find out more about book sizing here: https://en.wikipedia.org/wiki/Book_size
Because vellum was so expensive, and tough, people would sometimes scrape all the ink off a book, and write a different book on the blank pages. A book that has been erased and a new one written over it is called a palimpsest. One very famous example of this is the Archimedes Palimpsest https://www.historyofinformation.com/detail.php?id=3996 in which some numpty-head erased Archimedes’ incredibly rare maths treatise and wrote in some incredibly common religious stuff instead. The deleted (but recoverable) work is called the undertext.
Books are normally bound in quires, gatherings, or signatures, which are a certain number of leaves folded and assembled together, before being stitched along the fold. These quires are stacked and stitched together to make the volume. This sizing convention (folio, quarto, octavo) persisted when paper became more widely available and largely replaced vellum, so Shakespeare’s “First Folio” was printed in that size because of the high status it suggested.
The collation of a book is the structure in which the quires or signatures are bound. Most modern books have a regular number of pages in a quire, but it’s very common for older books to have an irregular structure, and when we collate a book and analyse that structure, it can tell us useful things aboutthe history of the book: what might be missing, what might have fallen out and been put back in the wrong place, whether the book has been rebound during its lifetime, and so on.
Collation is usually abbreviated a,b,c etc to indicate the signatures, with a number afterwards indicating the number of pages. The collation of De Arte Gladiatoria Dimicandi is: a10 b4 c-d10 e8. This means there are five signatures, the first is 10 folia, so five sheets of vellum folded in half; the second has four pages (so, is made of two sheets), and so on.
Unhelpfully for aspiring scholars, collation also refers to a comparison study between different versions of the same text (such as for instance a comparative study of the four Fiorean mss.)
The printing press was developed in about 1450, and by the standards of the time it took off like a rocket, with the numbers of books printed going up every year. The earliest printed books looked a lot like manuscripts, because at the time, that’s what books were supposed to look like.An incunable (or incunabulum, plural incunabula) is a printed book from the early days of print; the traditional cut-off point is 1500.
You can buy a facsimile edition: a facsimile is an accurate copy of a book. For instance, both the HEMA Bookshelf high-end gorgeous leather-bound edition of the Getty ms is a facsimile, and so is my affordable-end throw-it-in-your-fencing-bag-priced edition. You can imagine what it did to my geeky heart when I realised that the HEMA Bookshelf facsimile went so far as to recreate the actual collation of the original ms!
An exact facsimile is not really an ‘edition’ of the treatise. Edition implies some editorial changes. It would be fair to call my translation and commentary on De Arte Gladiatoria Dimicandi an edition of the treatise, because it’s not just the facsimile, it’s also a translation and commentary, with an introduction giving background on the book, the author, and the dedicatee.
A gloss is an explanation of a word or phrase, which is why the pdf at the bottom of this post is a “glossary”, a list of such explanations. But, when Peter von Danzig wrote a treatise in which he explains and expands on Liechtenauer's zettel (a set of mnemonic verses), that is also a “gloss”. Historically, glosses would often be written in the margins or between the lines of the original text. It would be fair to describe my own From Medieval Manuscript to Modern Practiceas a gloss of Fiore's longsword plays.
So what about their content? What’s the difference between a treatise and an essay and a monograph? This definition from Wikipedia is accurate: “A treatise is a formal and systematic written discourse on some subject, generally longer and treating it in greater depth than an essay, and more concerned with investigating or exposing the principles of the subject and its conclusions. A monograph is a treatise on a specialised topic.”
So, a single treatise may come in many different editions. For instance, Fabris’ Scienza d’Arme was published as a printed book in 1606, but there is also a manuscript version, and of course his original text would have been a manuscript (which as far as we know does not survive).
It is often necessary to transcribe a work, especially manuscripts. This can be done ‘diplomatically’, in which you copy out every character, diacritic (a mark used to distinguish different forms of a character, such as ë, é, etc.) and punctuation mark as accurately as possible, or allowing for more interpretation, such as expanding abbreviations. The word “p˜” appears in the Fiorean manuscripts very often, and represents the word “per”, for. A diplomatic transcription would use p˜, a more liberal transcription would expand it to “per”.
Translation is the process of converting the source text into a different language. There is no translation without interpretation, and there are differing degrees of translation. A literal translation (or metaphrase) converts each word into the target language without reference to the phrase it appears in or the work as a whole. This can lead to gibberish, especially when one word can have many different literal translations. “Match”, for example, could be translated into French as “allumette” (something to light a fire with), “partie” (a game), “rencontre” (meeting), “mariage” (romantic match), “égal” (equal), and so on.It’s generally more useful to do an analogous translation (or paraphrase), which is one where you find the closest match in the target language to the phrase you are translating.
You may do a modernisation while you’re at it- you can for example convert all spellings to their modern form, or even go so far as to update the syntax (the rules of sentence structure. You know a sentence bad is when read it you do).
What about the images?
In a manuscript the images are usually hand-drawn. There are exceptions, usually presentation manuscripts that have the images printed, and the text written in by hand (such as we see in the manuscript version of Fabris’ book, mentioned above). The earliest prints were made by carving the reverse of the image you want out of wood, leaving the lines you want printed untouched. This was then coated in ink and stamped onto the page. These woodcuts are quite characteristic. There's a useful article on how woodcuts were made here: https://www.adelaide.edu.au/library/special/exhibitions/history-of-book-illustration/woodcuts/ The The first edition of Marozzo’s Arte dell’Armi had woodcuts, like this one, as borrowed from Wiktenaur:
Some time in the 15th century (perhaps as early as 1430) they developed a technique for engraving (with a hard-pointed tool) or etching (with acid) the reversed images onto copper plates. https://www.adelaide.edu.au/library/special/exhibitions/history-of-book-illustration/copperplate-engravings/This gives much finer definition that you can get in a woodcut. The technique of copperplate engraving became widespread in the 16th century, and produces images like this one from my 1568 copy of Arte dell’Armi:
Phew! that's a lot of stuff to be getting on with. I've put together a PDF of these terms as a handy reference guide, which you may find useful. It's here:
For a really thorough look at the technical terms used to describe manuscripts, try Michelle P. Brown’s very thorough Understanding Illuminated Manuscripts: a guide to technical terms.
C. S. Lewis's Studies in Words is also useful: it is specifically about the difficulties in reading and understanding old books. Thanks to Jay Rudin for the recommendation.
If you are currently leading classes but think your students are not progressing as well as they could; or you are thinking about teaching historical martial arts one day; or you think of teaching as your best learning environment; then this course is for you.
To teach anything, you need to understand the students’ goal, show them a model of how to reach that goal, and create a feedback mechanism so that they can see whether they are moving in the right direction.
It’s that simple. But simple is not easy. Most clubs and schools I have seen have no trouble setting up basic choreographed drills: he does this, she does that, etc. but the basic drills don’t work in freeplay- indeed, why would they? So the focus of this course is developing actual skills. How do we set things up so that the students will be able to apply their art under pressure?
In this course you will find guidance on:
How to plan your classes
How to run your classes
How to run a beginners’ course
How to teach an advanced class (even if you are not very advanced yourself)
What to do when things go wrong
Teaching an individual lesson
Teaching a mixed-level class
Developing your students skills
Setting up freeplay
Using freeplay for training purposes
Designing a syllabus for your students to follow
And many other topics. You can find the course at 40% off the regular price here:
The course is delivered primarily as audio files and printable handouts, with some video clips to illustrate key drills. So you can absorb the bulk of the course while driving, cooking, hand-tooling a leather scabbard, or whatever else you may be doing.
Feel free to share this offer with anyone you think may be interested: just share this post, or the link, by email or on your social media accounts.
I recently interviewed Reinier van Noort for my podcast, and while we were talking he mentioned a documented set of solo forms for the Jaegerstock, a nine-foot long spear with a point at both ends. The source is Johann Georg Pascha’s book Kurtze ANLEIDUNG Wie der BASTON A DEUX BOUS, Das ist JAEGERSTOCK/ Halbe Pique oder Springe-stock Eigentlich zu gebrauchen und was vor Lectiones darauff seyn. This was originally printed in 1669, and is a translation of a French work. Reinier has published his translation (along with many more of Pascha’s works) in his book The Martial Arts of Johann Georg Pasha. I love solo training, and so promised in the show to figure out those solo forms and video them.
This turned into something of a project, including doing the research, making the weapon, figuring out the forms themselves, and so on. It struck me when I was starting out that it has been a long time since I approached a new source from scratch, and that it may be helpful to other scholars of historical martial arts to see how I get from the page to the physical action. It’s never just a question of read the whole book and then do all the actions- I always start with a small chunk of text and try it out. The process is iterative and cumulative, not linear.
I don’t intend to write this up in a formal way, but instead create a video log of the process, which will include asides, digressions, mistakes, ruminations, plenty of expletives, and eventually lead us to a working interpretation.
One note before we begin- there are several existing interpretations already out there, including Reinier’s own. In the normal run of things, if I was just trying to come up a working interpretation I would study those at the same time as creating my own- there is no sense in re-inventing the wheel. But because I want to illuminate my process of ab initio interpretation, I’m wilfully ignoring the existing ones. This is not best practice if other interpretations exist, but I’m doing it here to simulate the situation of being the first or only person working on a given text.
I’ve got half a dozen videos shot and edited already, so am planning to release them here on a weekly schedule. This gives you a chance to train along in real time, if you’d like to.
So, without further ado, here’s the first video:
This is part one of the Jaegerstock series. You can find the rest here as they are produced:
We have to move. If a shark stops swimming it dies- and if we stop moving it doesn’t take long before the problems mount up. We can get away with it for a bit longer than sharks, but sooner or later the bill comes due.
Swords are cool- cool enough to get people who have never even considered taking up a physical activity for fun before to actually start training. There are huge long-term health benefits to regular exercise, pretty much regardless of what that exercise is.
But no historical martial art is optimised for long-term health. It can’t be: the immediate needs of surviving the sword fight are more important than the possibility of eventually developing knee problems or back pain.
The specific ranges of motion required by a given sword fighting style may be quite extreme (such as in a rapier lunge), but they will never be comprehensive: in no style ever do you do a gentle forward stretch with a curved back, or indeed arch as far back as you can sensibly go, or even just touch your heel to your arse to stretch your quads. Those ranges of motion are good for us, but not included in the martial arts themselves.
I intend to be swinging swords around in various historical manners for decades to come, and I’m already 48. It is therefore necessary to have a physical practice aimed at filling in the gaps, and keeping this carcasse in sufficiently good shape that I can be whacking my friends over the head with blades when I’m 90. I also need to be able to teach my students how to do the same thing- and there’s the rub. Every body is different, and so every training regime should be tailored to the individual. And every body changes over time- ideally getting fitter and stronger, but at least not deteriorating any faster than we can help. Which means that you can’t just learn a routine now and stick with it forever, if you want the best results for the least effort.
I cover the fundamentals of how to train in my book The Windsor Method: The Principles of Solo Training and we follow those principles in class. But the book doesn’t include much in the way of specific exercises, because it was intended to lay out the principles, not cover every possible practice. The book will tell you how to train, and how to prioritise your training time, but it doesn’t tell you whether you should be doing push-ups or lunges right now.
To create our practice we need a comprehensive suite of exercises to select from, and the skill to choose from that suite wisely. We also need to know what it is we are training for at any given time. Here are some possibilities:
Pre-hab. Long-term injury prevention through movement, range of motion work, breathing and strength training. This is perhaps 50% of all my training.
Conditioning. Increasing our strength, speed, range of motion, or other attribute, through exercises of various kinds. This is about 40% of my training.
Warming up and warming down: preparing for a specific kind of movement (such as strength training, rapier footwork practice, a longsword tournament bout, or any other high-intensity activity), and promoting recovery afterwards. You may need to warm up for pre-hab or conditioning, of course.
A specific exercise such as an overhead press, or a push-up, or a hamstring stretch can be used in all three of these situations- but how we use it will differ.
I run a Trainalong training session over Zoom three mornings a week, and usually structure them like so:
Section One- warm-up.
1. Running a diagnostic. Gentle joint rotations from toes to fingers, with a few squats and some gentle range of motion work. This tells me whether I need to pay attention to a specific area, and whether the session I had in mind is likely to be a good idea.
2. Full range of motion of the spine
3. Shoulder stability work
Section Two: conditioning, focusing on my own areas of weakness, especially forearms.
1. Some kind of strength work, often bodyweight or kettlebells
2. Leg stability work such as seven-way legs, or kicking practice
3. Forearm conditioning
Section Three: skills practice
1. Some kind of footwork
2. Some kind of weapon handling (though often disguised as stick conditioning drills or bladebell exercises). These are often combined with the footwork, of course.
3. And/or breathing training, such as the Breathing Form.
Section Four: recovery
1. Some breathing
2. Some stretching, especially of the legs
3. Forearm and leg massage (which you may be familiar with from my free Human Maintenance course)
4. A very short meditation
5. Deliberately finishing.
Seeing it broken down like that doesn’t reflect the experience of it. The sections will blend into each other, and overlap- we may intersperse arm weights with footwork, for example. I very often include planks and other “core” work in with the spine range of motion or hip/knee stability exercises. The full-body survey at the beginning and the warm-down ending sequence tend to be quite consistent. I also adjust the training depending on my own health and current needs, and incorporating any requests that the students bring up on the day.
Some of the weird stuff we do sometimes includes jaw relaxation exercises, toe yoga, and finger dexterity drills.
I’ve attached a fairly comprehensive list of the exercises we do as a pdf below. Be warned, it’s just a list, and “Granny’s Scarf” may not mean anything to you just yet. But it should give you an idea of what I mean by ‘comprehensive’.
What about the skill to choose wisely from the list?
That is primarily a matter of mindset. If you go into a session with the intention of finding out what your body needs, and then carefully doing that, you will probably avoid injury, and certainly become better at listening to your body. As every body is different, I encourage my students to adapt or adjust what we’re doing to suit them. I may be recovering from an injury or illness, and be doing some gentle recovery work when we’re twenty minutes in- you may need to be doing push-ups or kettlebells while I’m resting. While the class is doing Turkish Get-ups, a student with a knee problem may be doing her prescribed rehab exercises.
Every exercise can be done at various levels of difficulty. Let’s take the humble push-up for example:
1. Knees on the ground, go down an inch.
2. Knees on the ground, work up to going all the way down.
3. One leg extended
4. Full push-up position, hold
5. Working up to a full basic pushup
6. Different hand positions- three knuckle, two knuckle, one knuckle, prima, seconda, quarta, hands wide, long, staggered, etc.
9. Plyo push-ups, eg clap push-ups, or push-up-twisting-squat-jump-burpees
10. One-armed push-ups
11. One-armed push-ups with different hand positions
12. Plyo one-armed push-ups
And so on.
I may be working on 6, while one student is on 2, and another on 11. Literally every exercise has easier and harder versions, so can be adapted to anyone’s current level.
It is very relaxing to just show up and do as you are told for a while, and indeed having a personal trainer who knows you well and pushes you as needed would be great. But as martial artists, more is expected of us. We can’t be dependent on external forces to guide our training- we must take ownership and responsibility for our own development. And outside a one-to-one coaching session, no trainer can perfectly adapt the class to your needs. But you can.
Sessions are free, or you can chip in some cash. Everyone is welcome, whether you’re super-fit or not fit at all (yet). You won’t hold up the class (or be held up) because we are all moving at our own pace.
I wrote Max Your Lunge in 2007, long before this blog was conceived. It's past time it became a properly formatted post!
My research into Capoferro's Gran Simulacro (1610) has lead me to rethink the lunge (which he calls l'incredibile accrescimento della botta lunga, “the incredible increase of the long blow”). He is absolutely clear about how long the lunge should be, and how much each part of the body moves, and famously defines them on plate 5 of his book. It occurred to me that when following his instructions to the letter, the resulting lunge gives the longest possible strike, in a very short motion of the foot.
The distance that any blow can travel is determined by the position of the fixed foot: how far you can move in a single pass forward is determined by the position of your front foot (as the back foot moves); so in the lunge, the maximum reach is determined by the position of the back foot. Whether your front, moving, foot is next to your back foot or a yard in front of it, affects only how long the action takes, not how far it can go. It is interesting (to me at least) that Capoferro defines the shape of the basic guard position, specifically the distance between your feet (the passo) only in the picture of the lunge; suggesting that the length of your lunge may determine the length of your guard. (You can find a copy of this plate on page 66 of The Duellist's Companion.)
So, how long is the lunge? The distance between your feet is the same as the length of your sword, or “twice the length of your arm” (as Jared Kirby pointed out in his seminar here in February 2007, this is a reference to the proportions of the Vitruvian man), your front knee is advanced slightly past your toes, and your front shoulder is above and slightly past your knee. The back foot pivots slightly on the ball, allowing the heel to slide forward. Your swordarm is completely extended. Drawing a line from the point of the sword to the toes of the back foot shows that the rear leg is almost exactly in line with the swordarm. This led me to wonder how long the lunge was in proportion to the maximum anatomically possible strike.
To discover this length, I lay on my back with my sword in hand, and had a student measure the distance between the outside edge of my left foot, and the point of my sword. This gave me a length of 328cm (129 inches).
We then measured out the same length from the centre of the thrusting target to a point on the floor, and marked the distance off with tape.
Standing on that mark, I placed my sword on the floor and lunged to its length (it has a 42″ blade).
Recovering to guard, and rechecking the position of my left foot, I took up my sword and lunged at the target, following my interpretation of Capo Ferro's instructions, leaving out only the turn of the back foot (which had not been allowed for in the initial measurement). The point of my sword touched the target.
I then turned my back foot, and the sword bent: the increase in the distance was about 10cm, or 4″.
By leaving out the foot turn in the initial measurement, I ensured that the lunge would penetrate a realistic amount, not just touch.
I then marked the spot where the back of my front heel landed,
and withdrew my foot until the toes were a little behind the mark (Capoferro shows the place of the front foot in guard as being directly behind the foot in the lunge). This gave me an exact length for my passo.
I then established my guard position according to the instructions, and lunged again from this position, making sure that the extension came first, and when that was complete, my hips moved forward, my knee went over my toes, and my back foot turned all in the space of time my front foot was in motion. This gave me the longest anatomically possible lunge, with a front foot movement of only about 12 inches, the maximum possible exchange of measure for time.
As a cross-check, I then measured the length of my lunge from front toes to back toes and found it to be about 57 inches, the length of my arm from armpit to fingertips to be 27 inches, so the length of my lunge was a trifle longer that twice the length of my arm.
Having done this myself, I then repeated the whole procedure for a small class of rapier students. Of course, with different length bodies and weapons, the maximum possible lunge was a different absolute length for each student. Out of six students, four men and two women, both women could reach their maximum lunge, and none of the men, primarily due to hip flexibility. However, none could easily recover, or felt comfortable in their maximum positions. More importantly, each student caught sight of an exact, measurable goal; to be able to lunge easily to the maximum distance, and recover fluidly to the correct guard position.
So, it is my belief that Capoferro describes the perfect lunge for his weapon. It is practically impossible to execute any kind of blade action with a full-size rapier while lunging, so Capoferro has us be able to strike from as far away as possible, in as short a time as possible. While your foot is in the air it is very hard to support your blade with strength, and so it is the ideal time for your opponent to counter; minimising the foot movement (by keeping it as far forwards as practically possible) while maintaining the maximum distance of your face from his point (by keeping your weight back) gives you the ideal tactical compromise. Of course, the sword still has a long way to go, but for most of that distance, you have both feet on the ground and can therefore execute blade actions more easily.
So, how do you train to achieve this ideal lunge? stretching, for flexibility, strength training for support and recovery, and going at it little by little. A short lunge that doesn't hurt you is much more useful than a long one that pulls a muscle. But by having an ideal to work towards, we can measure our progress towards an achievable goal.
With thanks to Kevin O'Brien (photographer), Heikki Hallamaa, and Karolina Suominen
What the world really needs right now is obviously a better beginners’ guide to training in Fiore’s Art of Arms, right? So I have created one. So what's special about that?
I always, always, try to instil self-direction into my students. My job is to make myself redundant. I do this in practice by giving even beginners in their very first class some agency to choose what we cover. By the time they get to the seniors class (usually in a year or two), classes are entirely student-led: we cover whatever they need my help with that day.
Books are a very linear model, and while I can lay out my usual path through the enormous range of the Fiore syllabus, that restricts the reader’s agency to an unfortunate degree. But actually, very few of my readers ever read from cover to cover. Everyone skips ahead to the things they are most interested. And why not? They’ve bought the book, they can do whatever they want with it.
So I have figured out how to include gradually increasing levels of choice for the reader/student in these workbooks. The series will comprise several workbooks. The first is the Beginner’s Course, of eight lessons each with about as much stuff as I’d cover in a single 90 minute class. In the first class of the first book, you get one simple choice. In the second class, there’s more freedom.At every stage, if you need prior material to successfully approach the topic at hand, that will be flagged up. So even if you skipped that section for some reason, you can go to the specific prerequisite material and practice that before returning to the thing you want to do next.
There are as many correct paths through the syllabus as there are students to walk them. In this new series I have finally figured out how to represent that on the page.
Every technique, every drill, is presented as written instructions with images from the source manuscript, and over 40 video clips. Each video is linked to with a QR code on the relevant page, so you can just point your smartphone at the page and it will open the video for you. There is abundant space for your own written notes, which is especially necessary when you are not working through the material in the order it appears in the text.
It’s a choose your own path training manual.
Part One covers the following material:
Unarmed techniques
The four guards of abrazare (wrestling)
The first six plays of abrazare
The four steps (footwork)
The three turns (footwork)
With the Dagger
The four blows of the dagger
Disarms against forehand, backhand, and rising dagger thrusts
Counters to the disarms
Arm locks and counters
How to fall safely
A basic takedown/throw
With the Longsword
Six ways to hold the longsword
The seven blows of the longsword
How to parry and strike
How to counter the parry with a pommel strike
How to counter the pommel strike
The exchange of thrusts
Breaking the thrusts
Training on the pell
That's a lot of material- but thanks to the format it’s presented in, it should be thoroughly attainable.
The book is in layout now; all the video clips have been edited and uploaded, the QR codes created, and so on. We even have the covers.
There is a limited number of pre-order slots available, which will help pay for the layout and cover graphic design work, and the editing costs. Pre-orders are for the print version, but also include the ebook.
I hope to get the ebook version out to those that pre-order in a week or so, and the print workbooks ready to ship by the end of this month.
The workbook should be more widely available in May.