Guy's Blog

Guy frequently keeps this blog updated with thoughts, challenges, interviews and more!

We have to move. If a shark stops swimming it dies- and if we stop moving it doesn’t take long before the problems mount up. We can get away with it for a bit longer than sharks, but sooner or later the bill comes due.

Swords are cool- cool enough to get people who have never even considered taking up a physical activity for fun before to actually start training. There are huge long-term health benefits to regular exercise, pretty much regardless of what that exercise is.

But no historical martial art is optimised for long-term health. It can’t be: the immediate needs of surviving the sword fight are more important than the possibility of eventually developing knee problems or back pain. 

The specific ranges of motion required by a given sword fighting style may be quite extreme (such as in a rapier lunge), but they will never be comprehensive: in no style ever do you do a gentle forward stretch with a curved back, or indeed arch as far back as you can sensibly go, or even just touch your heel to your arse to stretch your quads. Those ranges of motion are good for us, but not included in the martial arts themselves. 

I intend to be swinging swords around in various historical manners for decades to come, and I’m already 48. It is therefore necessary to have a physical practice aimed at filling in the gaps, and keeping this carcasse in sufficiently good shape that I can be whacking my friends over the head with blades when I’m 90. I also need to be able to teach my students how to do the same thing- and there’s the rub. Every body is different, and so every training regime should be tailored to the individual. And every body changes over time- ideally getting fitter and stronger, but at least not deteriorating any faster than we can help. Which means that you can’t just learn a routine now and stick with it forever, if you want the best results for the least effort.

I cover the fundamentals of how to train in my book The Windsor Method: The Principles of Solo Training  and we follow those principles in class. But the book doesn’t include much in the way of specific exercises, because it was intended to lay out the principles, not cover every possible practice. The book will tell you how to train, and how to prioritise your training time, but it doesn’t tell you whether you should be doing push-ups or lunges right now.

 To create our practice we need a comprehensive suite of exercises to select from, and the skill to choose from that suite wisely. We also need to know what it is we are training for at any given time. Here are some possibilities:

  • Pre-hab. Long-term injury prevention through movement, range of motion work, breathing and strength training. This is perhaps 50% of all my training.
  • Conditioning. Increasing our strength, speed, range of motion, or other attribute, through exercises of various kinds. This is about 40% of my training.
  • Warming up and warming down: preparing for a specific kind of movement (such as strength training, rapier footwork practice, a longsword tournament bout, or any other high-intensity activity), and promoting recovery afterwards. You may need to warm up for pre-hab or conditioning, of course.

A specific exercise such as an overhead press, or a push-up, or a hamstring stretch can be used in all three of these situations- but how we use it will differ. 

I run a Trainalong training session over Zoom three mornings a week, and usually structure them like so:

Section One- warm-up.

1. Running a diagnostic. Gentle joint rotations from toes to fingers, with a few squats and some gentle range of motion work. This tells me whether I need to pay attention to a specific area, and whether the session I had in mind is likely to be a good idea.

2. Full range of motion of the spine

3. Shoulder stability work

Section Two: conditioning, focusing on my own areas of weakness, especially forearms.

1. Some kind of strength work, often bodyweight or kettlebells

2. Leg stability work such as seven-way legs, or kicking practice

3. Forearm conditioning

Section Three: skills practice

1. Some kind of footwork

2. Some kind of weapon handling (though often disguised as stick conditioning drills or bladebell exercises). These are often combined with the footwork, of course.

3. And/or breathing training, such as the Breathing Form.

Section Four: recovery

1. Some breathing

2. Some stretching, especially of the legs

3. Forearm and leg massage (which you may be familiar with from my free Human Maintenance course)

4. A very short meditation

5. Deliberately finishing.

Seeing it broken down like that doesn’t reflect the experience of it. The sections will blend into each other, and overlap- we may intersperse arm weights with footwork, for example. I very often include planks and other “core” work in with the spine range of motion or hip/knee stability exercises. The full-body survey at the beginning and the warm-down ending sequence tend to be quite consistent. I also adjust the training depending on my own health and current needs, and incorporating any requests that the students bring up on the day. 

Some of the weird stuff we do sometimes includes jaw relaxation exercises, toe yoga, and finger dexterity drills. 

I’ve attached a fairly comprehensive list of the exercises we do as a pdf below. Be warned, it’s just a list, and “Granny’s Scarf” may not mean anything to you just yet. But it should give you an idea of what I mean by ‘comprehensive’. 

What about the skill to choose wisely from the list?

That is primarily a matter of mindset. If you go into a session with the intention of finding out what your body needs, and then carefully doing that, you will probably avoid injury, and certainly become better at listening to your body. As every body is different, I encourage my students to adapt or adjust what we’re doing to suit them. I may be recovering from an injury or illness, and be doing some gentle recovery work when we’re twenty minutes in- you may need to be doing push-ups or kettlebells while I’m resting. While the class is doing Turkish Get-ups, a student with a knee problem may be doing her prescribed rehab exercises.

Every exercise can be done at various levels of difficulty. Let’s take the humble push-up for example:

1. Knees on the ground, go down an inch.

2. Knees on the ground, work up to going all the way down.

3. One leg extended

4. Full push-up position, hold

5. Working up to a full basic pushup

6. Different hand positions- three knuckle, two knuckle, one knuckle, prima, seconda, quarta, hands wide, long, staggered, etc.

7. Going for more repetitions

8. Slow push-ups (eg 30 seconds down, 30 seconds up)

9. Plyo push-ups, eg clap push-ups, or push-up-twisting-squat-jump-burpees

10. One-armed push-ups

11. One-armed push-ups with different hand positions

12. Plyo one-armed push-ups

And so on.

I may be working on 6, while one student is on 2, and another on 11. Literally every exercise has easier and harder versions, so can be adapted to anyone’s current level.

It is very relaxing to just show up and do as you are told for a while, and indeed having a personal trainer who knows you well and pushes you as needed would be great. But as martial artists, more is expected of us. We can’t be dependent on external forces to guide our training- we must take ownership and responsibility for our own development. And outside a one-to-one coaching session, no trainer can perfectly adapt the class to your needs. But you can. 

One way to learn to do that is to come to my Trainalong sessions. You can find them here: https://bookwhen.com/swordschool

Sessions are free, or you can chip in some cash. Everyone is welcome, whether you’re super-fit or not fit at all (yet). You won’t hold up the class (or be held up) because we are all moving at our own pace.

Other useful links on this topic:

You may find The Windsor Method helpful: https://swordschool.com/library-item/the-windsor-method-the-principles-of-solo-training/

I cover a lot of the exercises in the Solo Training course, though that course focusses primarily on weapons handling. https://swordschool.teachable.com/p/solo-training 

You can have a go with a sample session here:

You can download the exercises list here: Trainalong Curriculum

You may find my conversation with biomechanist Katy Bowman interesting: https://swordschool.com/podcast/movement-matters-with-katy-bowman/

I wrote Max Your Lunge in 2007, long before this blog was conceived. It's past time it became a properly formatted post!

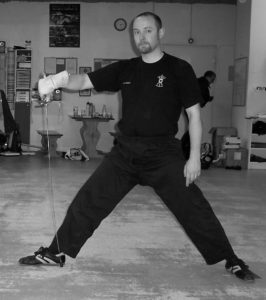
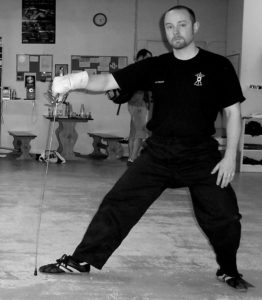
My research into Capoferro's Gran Simulacro (1610) has lead me to rethink the lunge (which he calls l'incredibile accrescimento della botta lunga, “the incredible increase of the long blow”). He is absolutely clear about how long the lunge should be, and how much each part of the body moves, and famously defines them on plate 5 of his book. It occurred to me that when following his instructions to the letter, the resulting lunge gives the longest possible strike, in a very short motion of the foot.

The distance that any blow can travel is determined by the position of the fixed foot: how far you can move in a single pass forward is determined by the position of your front foot (as the back foot moves); so in the lunge, the maximum reach is determined by the position of the back foot. Whether your front, moving, foot is next to your back foot or a yard in front of it, affects only how long the action takes, not how far it can go. It is interesting (to me at least) that Capoferro defines the shape of the basic guard position, specifically the distance between your feet (the passo) only in the picture of the lunge; suggesting that the length of your lunge may determine the length of your guard. (You can find a copy of this plate on page 66 of The Duellist's Companion.)

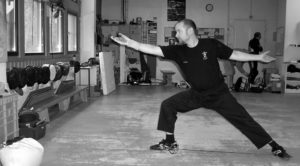
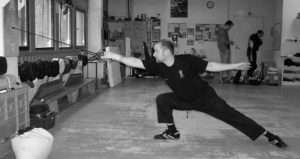
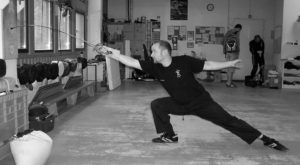
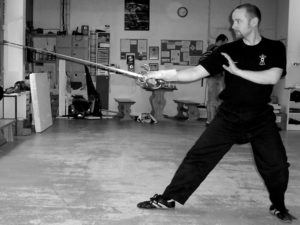
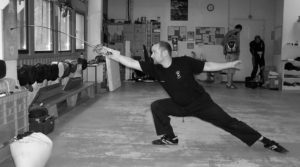
So, how long is the lunge? The distance between your feet is the same as the length of your sword, or “twice the length of your arm” (as Jared Kirby pointed out in his seminar here in February 2007, this is a reference to the proportions of the Vitruvian man), your front knee is advanced slightly past your toes, and your front shoulder is above and slightly past your knee. The back foot pivots slightly on the ball, allowing the heel to slide forward. Your swordarm is completely extended. Drawing a line from the point of the sword to the toes of the back foot shows that the rear leg is almost exactly in line with the swordarm. This led me to wonder how long the lunge was in proportion to the maximum anatomically possible strike.
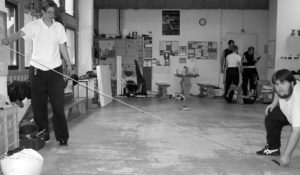
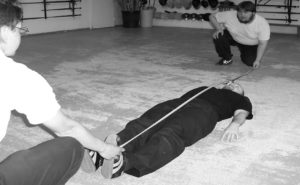
To discover this length, I lay on my back with my sword in hand, and had a student measure the distance between the outside edge of my left foot, and the point of my sword. This gave me a length of 328cm (129 inches).

We then measured out the same length from the centre of the thrusting target to a point on the floor, and marked the distance off with tape.

Standing on that mark, I placed my sword on the floor and lunged to its length (it has a 42″ blade).

Recovering to guard, and rechecking the position of my left foot, I took up my sword and lunged at the target, following my interpretation of Capo Ferro's instructions, leaving out only the turn of the back foot (which had not been allowed for in the initial measurement). The point of my sword touched the target.

I then turned my back foot, and the sword bent: the increase in the distance was about 10cm, or 4″.

By leaving out the foot turn in the initial measurement, I ensured that the lunge would penetrate a realistic amount, not just touch.

I then marked the spot where the back of my front heel landed,

and withdrew my foot until the toes were a little behind the mark (Capoferro shows the place of the front foot in guard as being directly behind the foot in the lunge). This gave me an exact length for my passo.

I then established my guard position according to the instructions, and lunged again from this position, making sure that the extension came first, and when that was complete, my hips moved forward, my knee went over my toes, and my back foot turned all in the space of time my front foot was in motion. This gave me the longest anatomically possible lunge, with a front foot movement of only about 12 inches, the maximum possible exchange of measure for time.

As a cross-check, I then measured the length of my lunge from front toes to back toes and found it to be about 57 inches, the length of my arm from armpit to fingertips to be 27 inches, so the length of my lunge was a trifle longer that twice the length of my arm.

Having done this myself, I then repeated the whole procedure for a small class of rapier students. Of course, with different length bodies and weapons, the maximum possible lunge was a different absolute length for each student. Out of six students, four men and two women, both women could reach their maximum lunge, and none of the men, primarily due to hip flexibility. However, none could easily recover, or felt comfortable in their maximum positions. More importantly, each student caught sight of an exact, measurable goal; to be able to lunge easily to the maximum distance, and recover fluidly to the correct guard position.

So, it is my belief that Capoferro describes the perfect lunge for his weapon. It is practically impossible to execute any kind of blade action with a full-size rapier while lunging, so Capoferro has us be able to strike from as far away as possible, in as short a time as possible. While your foot is in the air it is very hard to support your blade with strength, and so it is the ideal time for your opponent to counter; minimising the foot movement (by keeping it as far forwards as practically possible) while maintaining the maximum distance of your face from his point (by keeping your weight back) gives you the ideal tactical compromise. Of course, the sword still has a long way to go, but for most of that distance, you have both feet on the ground and can therefore execute blade actions more easily.

So, how do you train to achieve this ideal lunge? stretching, for flexibility, strength training for support and recovery, and going at it little by little. A short lunge that doesn't hurt you is much more useful than a long one that pulls a muscle. But by having an ideal to work towards, we can measure our progress towards an achievable goal.

With thanks to Kevin O'Brien (photographer), Heikki Hallamaa, and Karolina Suominen

What the world really needs right now is obviously a better beginners’ guide to training in Fiore’s Art of Arms, right? So I have created one. So what's special about that?

I always, always, try to instil self-direction into my students. My job is to make myself redundant. I do this in practice by giving even beginners in their very first class some agency to choose what we cover. By the time they get to the seniors class (usually in a year or two), classes are entirely student-led: we cover whatever they need my help with that day.

Books are a very linear model, and while I can lay out my usual path through the enormous range of the Fiore syllabus, that restricts the reader’s agency to an unfortunate degree. But actually, very few of my readers ever read from cover to cover. Everyone skips ahead to the things they are most interested. And why not? They’ve bought the book, they can do whatever they want with it. 

So I have figured out how to include gradually increasing levels of choice for the reader/student in these workbooks. The series will comprise several workbooks. The first is the Beginner’s Course, of eight lessons each with about as much stuff as I’d cover in a single 90 minute class. In the first class of the first book, you get one simple choice. In the second class, there’s more freedom.  At every stage, if you need prior material to successfully approach the topic at hand, that will be flagged up. So even if you skipped that section for some reason, you can go to the specific prerequisite material and practice that before returning to the thing you want to do next.

There are as many correct paths through the syllabus as there are students to walk them. In this new series I have finally figured out how to represent that on the page. 

Every technique, every drill, is presented as written instructions with images from the source manuscript, and over 40 video clips. Each video is linked to with a QR code on the relevant page, so you can just point your smartphone at the page and it will open the video for you. There is abundant space for your own written notes, which is especially necessary when you are not working through the material in the order it appears in the text. 

It’s a choose your own path training manual.

Part One covers the following material:

Unarmed techniques

The four guards of abrazare (wrestling)

The first six plays of abrazare

The four steps (footwork)

The three turns (footwork)

With the Dagger

The four blows of the dagger

Disarms against forehand, backhand, and rising dagger thrusts

Counters to the disarms

Arm locks and counters

How to fall safely

A basic takedown/throw

With the Longsword

Six ways to hold the longsword

The seven blows of the longsword

How to parry and strike

How to counter the parry with a pommel strike

How to counter the pommel strike

The exchange of thrusts

Breaking the thrusts

Training on the pell


That's a lot of material- but thanks to the format it’s presented in, it should be thoroughly attainable.

The book is in layout now; all the video clips have been edited and uploaded, the QR codes created, and so on. We even have the covers. 

There is a limited number of pre-order slots available, which will help pay for the layout and cover graphic design work, and the editing costs. Pre-orders are for the print version, but also include the ebook. 

I hope to get the ebook version out to those that pre-order in a week or so, and the print workbooks ready to ship by the end of this month.

The workbook should be more widely available in May.

You can preorder the right-handed layout here: https://guywindsor.gumroad.com/l/aw1RHpreorder

And the left-handed layout here: https://guywindsor.gumroad.com/l/aw1LHpreorder

A very inexperienced Guy teaching class in 2001

21 years ago today I taught my first class as a professional instructor. It was in a small room in the Helsinki Olympic Stadium. I expected about six people to show up, but we had over 70, from as far afield as Turku and Tampere. My class plan went out of the window because there was no space for that many folk to take part, so I talked for a bit, and then got everyone doing some really basic mechanics. Many of the people who showed up that day kept showing up for years afterwards, and it's thanks to them that we have a school.

The rest is literally history!

While thinking about the best way to celebrate the School’s survival over the last 21 years, it struck me that I really like teaching classes and hanging out with my students, so I’ve decided to run a couple of seminars, which are free or you can pay something if you want to. Given the constraints of teaching over zoom, these classes will be on solo training- a warm-up, some footwork and mechanics, and some blade handling, followed by time for questions and answers. To accommodate the fact that most of my students are in the USA and so miss all the morning sessions, these will be at 7pm UK time on Sunday 20th and 27th March. There are more details etc. on the booking pages:

Longsword Seminar: https://bookwhen.com/swordschool/e/ev-s82s-20220320190000

Rapier Seminar: https://bookwhen.com/swordschool/e/ev-si53-20220327190000

I hope to see you there!

I have also set up a discount code: SWORDSCHOOL21BDAY for 50% off all my books on Gumroad and courses on Teachable. Except the free ones, they’re still $0.
Regarding my Gumroad shop, I’ve removed most of the free treatise photos etc. from the webshop because the file sizes exceed Gumroad’s terms and conditions for free products. I am looking around for better ways to host and share these resources- if you’ve got any suggestions, let me know!
The discount code expires on March 31st.

Thanks for being part of it!

Holding the sword correctly is safer

One of my students mentioned tendonitis problems in his wrist on the Swordschool Discord server this week. It’s probably caused by holding his sword incorrectly, which forces the small stabiliser muscles to do more work than they evolved for. He is by no means the first student I’ve seen with this problem.

It has been my experience that almost every sword student at any level in any style is either holding their sword incorrectly, or at the very least, there was room for improvement. This is partly due to most modern sword makers producing handles that are a bit too big (my friends at Arms and Armor have a post on this, here), or a bit too round; and partly due to most people simply not understanding how the mechanics of sword holding is supposed to work.

In essence, your grip strength and wrist stabilisation strength should be acting as back-up systems only: the sword should stay in your hand with almost no strength being used at all, and when you strike, the force coming back from the target should be routed through the bones of your hands and wrist, and thence through your body to the ground, with no need to tighten up on impact at all.

Seriously. Not at all. 

Have a look at this video of me hitting the wall target with a rapier, and bashing the tyre with a longsword. My hand is not just relaxed, it’s actually open, to demonstrate beyond reasonable doubt that grip strength is not required. 

I have been banging this drum for many, many, years now (I first posted that video in 2012!), and have written this up in many places, and posted endless video content about it, and yet still the sword world has crappy sword holding skills. This is for three reasons:

1. the sword handle is too big 

2. because this is very counter-intuitive

3. and also because most people are strong enough to fake it for a while; they think it’s correct, when actually their muscles are faking it for them. Until the pain in the first joint of the thumb kicks in. Or in the elbow. Or indeed anywhere along the chain from fingertip to toes. 

So how should you hold the sword? 

That depends on what kind of sword it is, and what you want to do with it. 

Generally, the sword is either held back in the hand, like so:

Guy Windsor Holding a sword, chambered grip


Or extended in the grip, like so:

Guy Windsor holding a sword in an extended grip


This is also how most chefs hold their kitchen knives when chopping and slicing.

Guy Windsor holding a kitchen knife slicing cucumber. Grip is extended.

There are exceptions: we do sometimes support the flat instead of the edge, like so:

Guy Windsor holding the sword thumb on flat


The sword is usually held back in the hand when it’s also held back near the body, and extended in the hand when the sword arm is extended from the body. Some longsword folk have half-understood this concept and hold their longsword in the extended grip even when the guard is chambered (such as in posta di donna). Some swords are almost always held in the extended grip; rapiers, foils, smallswords are good examples. The basic rule still applies- when holding the sword it should be supported by the bones, not tied in place by the muscles.

The extended grip does not depend on grip strength; you can perfectly well hold the sword with one finger, if it's aligned correctly, like so:


Guy Windsor holding a sword, fingers open.

I'm not recommending fighting like this, but it's worth making sure you're not depending on grip strength when holding the sword by opening the thumb, forefinger, ring finger, and little finger, and seeing what happens.

One common error is to extend the wrist, rather than extend the sword in the grip. You need to be able to distinguish between at least three positions of the hand relative to the forearm. Three-knuckle, two-knuckle, and one-knuckle. The easiest way to learn the differences between them is through “Eurythmic push-ups”. You can do them on a mat if you prefer, and you don’t actually need to do the push-up bit; just getting the feeling of the different wrist positions is very helpful.

Cocking the wrist between the ‘three-knuckle’ and ‘one-knuckle’ positions instead of allowing the sword to shift in the grip between the ‘chambered’ and ‘extended’ grips is another common cause of wrist problems.

Please pay attention, this may save you a lot of pain, as well as massively improve your general sword handling.

Holding the Longsword

I introduce the basics of how to hold a longsword in this video borrowed from my Solo Training course

Holding the Rapier

This footage from a rapier seminar I taught in 2012 goes into the correct grip for the rapier in some detail; you can watch the whole thing of course, or skip to about 22 minutes in, where we get into the grip.

If you are already having wrist problems, for any reason, you may find my Arm Maintenance course useful. It’s free, and bundled in with my Human Maintenance course. 

One of the things I’m enjoying most about learning to fly is being an absolute beginner, and making beginners’ mistakes. Such as:

  • Getting my radio check and airfield information call in to the office (we don’t have a tower at this airfield), and wondering why I couldn’t get a reply even though the radio seemed to be working just fine. Turns out I had the volume turned down too low.
  • Having successfully landed the plane (yay! That’s the critical bit), when taxiing back towards the place where the planes are parked, my tail got caught in a bit of cross-wind, and I ended up getting the plane stuck in the rough grass between taxi-way and runway. That meant getting out and pushing while the instructor (Clive) drove us out. Clive has been (gently) mocking my “gardening skills” ever since. He also spent the rest of the taxi-way ride rolling a cigarette, manifesting complete confidence in my ability to go not gardening again. Planes on the ground are steered entirely with the feet, so he could actually have steered us out of trouble if necessary, but it’s fascinating to see how something I do all the time in class to essentially trick my students into relaxing, is being done to me, and I can see it and understand it, and it still works. I don't roll cigarettes, but I try to exude a sense of absolute confidence in my students.
  • Forgetting to check under my wing before turning in that direction. Instructor says ‘make a right turn’, and I just start doing it, instead of following correct procedure and actually checking for myself that it’s safe to do so and we’re not about to bump into something. Not that there’s much likelihood of that, where we are, but it’s essential to check, just like checking your mirrors before making a turn in a car. Incidentally, I had no problem with that in the previous lesson (on turns), but this lesson was on the stall,* and so the turns weren’t the focus. I was thinking about the stall, not the turn, and so forgot something essential that I had been fine with previously.

And, most interestingly for me, for the first five lessons I had practically no questions. I didn’t know enough to know what to ask. That phase seems to have passed and I am now pestering my instructors with all sorts of questions. It’s also instructive to note that there are many things that have been explained to me such that I understood them just fine, but couldn’t hold on to the idea until I’d seen it again, usually after a practical exercise in the plane that demonstrated the idea in action. Being able to follow the logic of an explanation is not the same thing as remembering, which is also not the same thing as really knowing and understanding.

I cannot overstate how useful this is to me as an instructor. It has been a very long time since I was last a real beginner at something; most of the new things I’ve learned over the last decade or so have been somehow related to things I’m already competent at, which changes things completely.

The instructors at Skyward are all nice; they don’t berate you for mistakes, just encourage you to learn. I think they’ve been a bit surprised by how I’m not at all embarrassed by making a mistake- I know many of my beginners often are embarrassed. Beginners taxi planes into the long grass, forget to check under their wing before a turn, fail to turn the radio volume up, and do all sorts of other silly things. It’s the beginner’s job to pay attention and do their honest best to do follow instructions. That’s it. It’s the instructor’s job to make sure that the beginner’s mistakes are survivable, and this is as true in martial arts as it is in flying.

I hope that all my beginners have felt that they were free to fail because I was there to create a safe space for them to fail in. But it’s been so long since I was last truly in their position that while I could be nice to them, I didn’t really understand their situation any more. In the past I have been a bit baffled by a lack of questions in a beginners’ group, or when this thing they could do just fine last time was now going wrong. I hope I met that with kindness before, but now I can meet it with comprehension too.


*A stall in an aircraft is what happens when the angle that the wing is meeting the air (the “angle of attack”) gets too steep, or there is not enough air flow, so the smooth flow of air over the top surface of the wing breaks up into turbulent eddies, and you lose lift. You fix it by putting the stick forward a bit, to lower the angle of attack (and gain some speed). It has nothing to do with the engine conking out- that’s a whole other problem.

Search

Categories

Categories

Tags